Note
URL rewriting only applies during recording. The transformed URLs are saved in the recorded response files, so during replay mode, the already-transformed responses are served.
For a basic introduction to HTTP record and replay with examples have a look at Record and replay HTTP requests and responses to create API mocks.
First, go to HTTP in the top navigation bar and then click Export.

Click the button to download a ZIP file that contains all of the HTTP mappings in the WireMock format.
You can also export programmatically using the Traffic Parrot Management APIs.
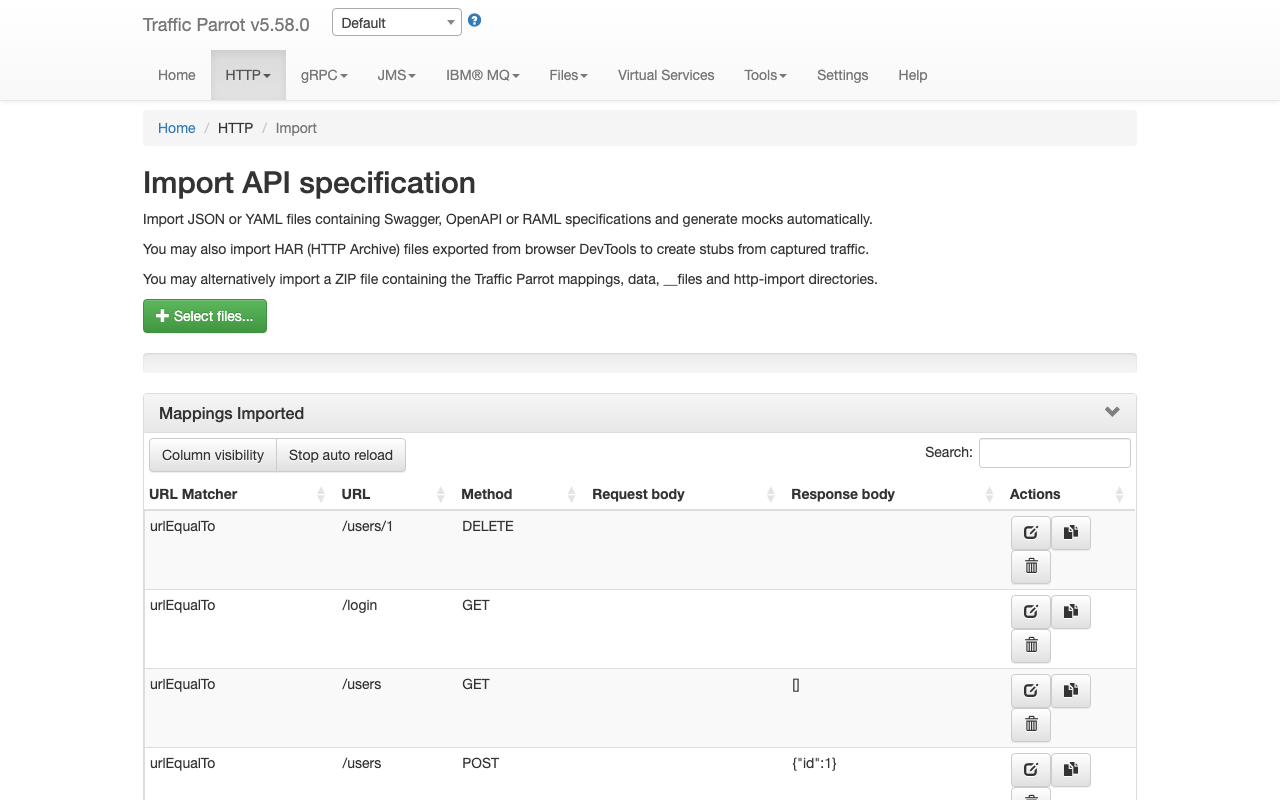
First, go to HTTP in the top navigation bar and then click Import.
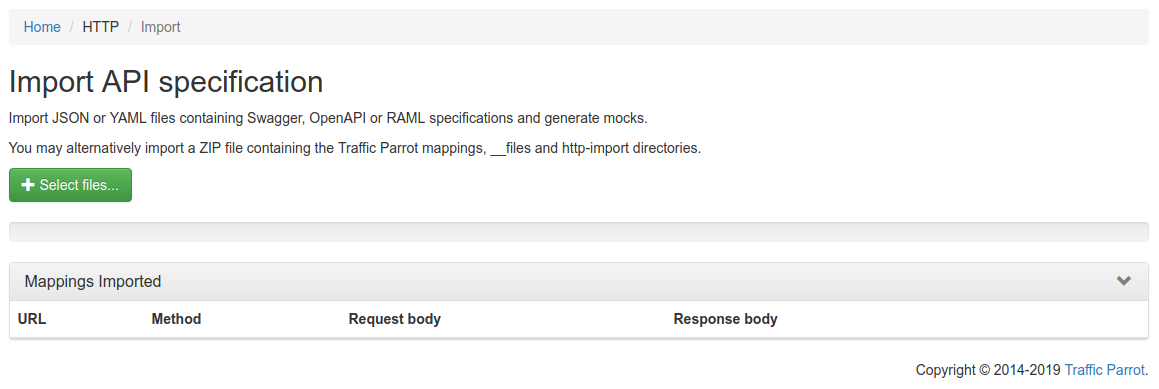
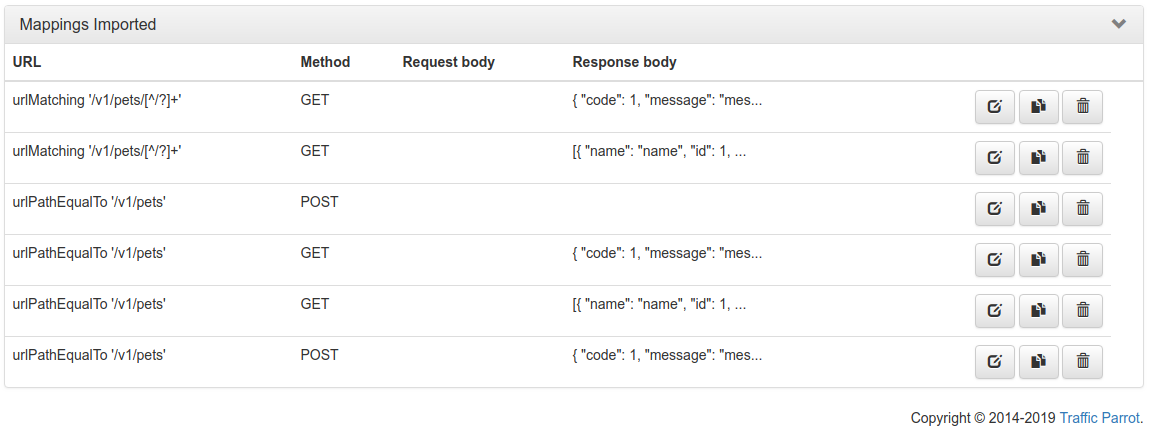
Click the button and select the file(s) to import using the file picker. Traffic Parrot will display the mappings that were successfully imported in the table below.
You can also import programmatically using the Traffic Parrot Management APIs.
HAR (HTTP Archive) files let you create stubs from captured network traffic rather than writing them from scratch. To obtain a HAR file:
Then import the .har file. Traffic Parrot creates a stub mapping for each HTTP request/response pair, named with a [HAR Import] prefix followed by the status code, HTTP method, and URL path for easy identification.
Other request headers (Accept, User-Agent, Cookie, etc.) and response headers are excluded to keep stubs flexible. HAR files can also be placed inside ZIP archives in the http-import/ directory.
When you upload a HAR or OpenAPI file, Traffic Parrot shows a preview of the entries before importing. This lets you review, filter, and select exactly which stubs to create.
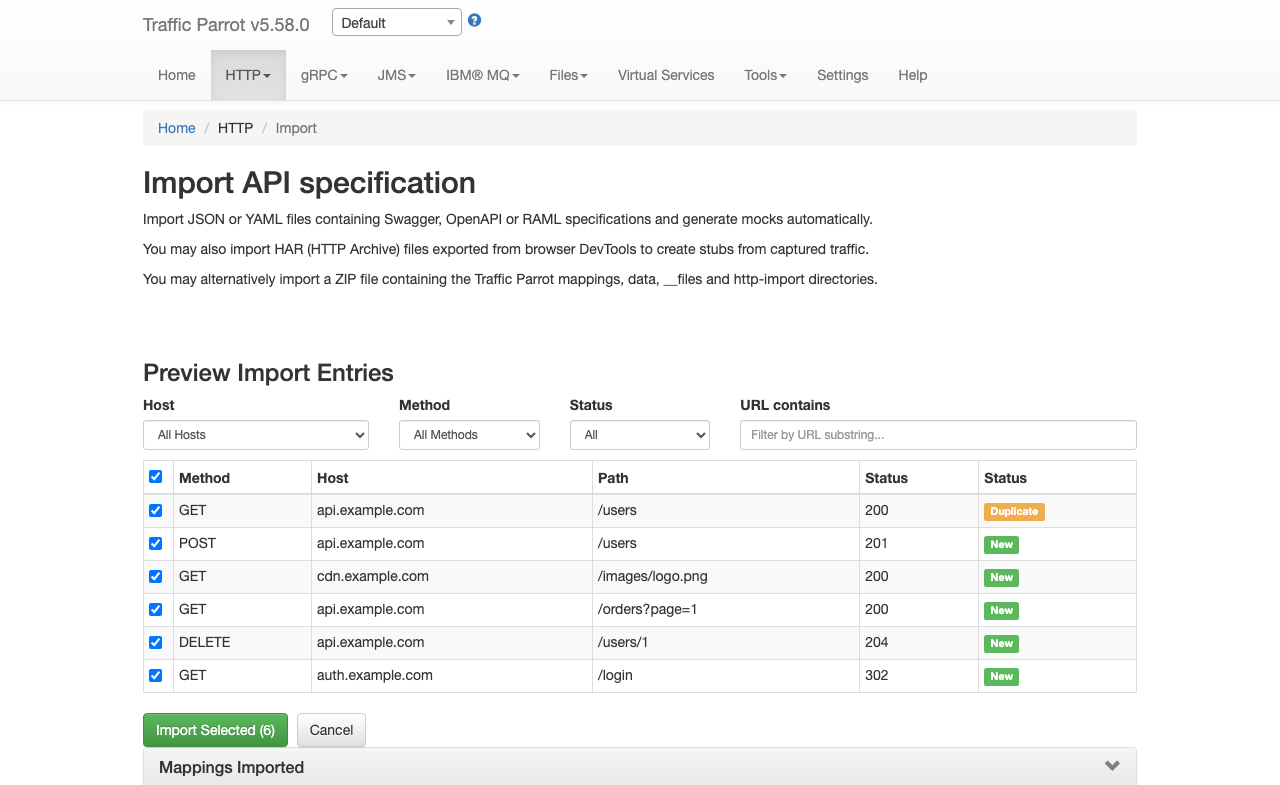
The preview panel provides four filters that you can use to narrow down the entries:
All filtering happens instantly in the browser without extra server requests. Filters combine with AND logic (e.g. selecting host "api.example.com" and method "POST" shows only POST requests to api.example.com).
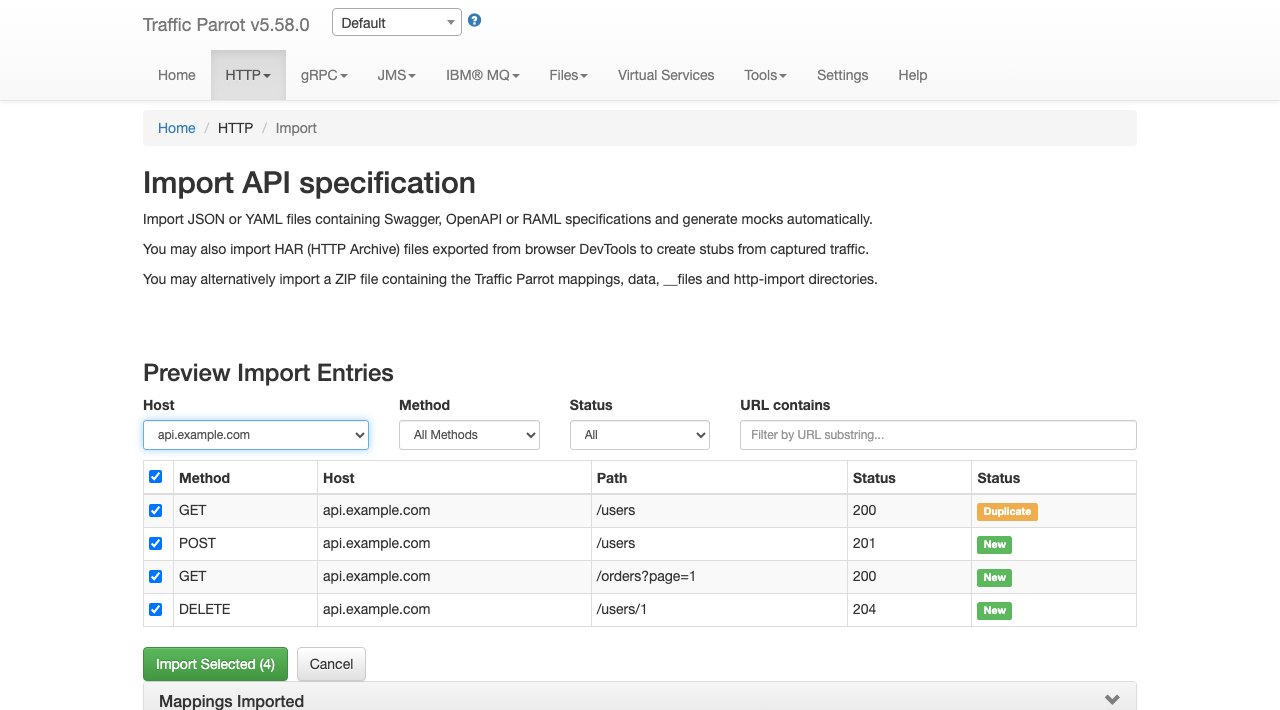
Each entry has a checkbox. Use the header checkbox to select or deselect all visible (filtered) entries at once. You can also toggle individual entries. The "Import Selected" button shows the count of selected entries and is disabled when no entries are selected.
The Status column shows whether each entry is new or already exists. Entries that do not match any existing stub display a green "New" badge. If an entry matches an existing stub with the same HTTP method and URL, a yellow "Duplicate" badge appears instead, helping you avoid importing stubs that already exist.
Click "Import Selected" to create stubs only for the checked entries. The imported mappings appear in the table below. Click "Cancel" to discard the preview and return to the file selector.
The preview and filter flow is available for HAR and OpenAPI/Swagger files. RAML files and WireMock ZIP archives are imported directly without a preview step.
You can import mapping files programmatically using the REST API instead of the web UI. This is useful for CI/CD pipelines and automation scripts.
Send a POST request to /http/management/importMappings
with the file(s) as a multipart form upload:
# Import a single file (HAR, OpenAPI/Swagger, RAML, or WireMock ZIP)
curl -X POST http://localhost:8080/http/management/importMappings \
  -F "files[]=@capture.har"

# Import multiple files at once
curl -X POST http://localhost:8080/http/management/importMappings \
  -F "files[]=@api-spec.yaml" \
  -F "files[]=@capture.har"
On success, the response contains the IDs of the imported mappings:
{"mappings":["id1","id2",...]}On failure, the response returns HTTP 400 with an error message:
{"result":"error message"}This endpoint supports all supported import formats: HAR, Swagger/OpenAPI, RAML, and WireMock ZIP.
You can preview the entries that would be created before committing to an import.
Send a POST request to /http/management/previewImport:
curl -X POST http://localhost:8080/http/management/previewImport \
  -F "file=@capture.har"
The response contains a list of entries with their method, host, path, and status code:
{
  "previewSupported": true,
  "entries": [
    {"index": 0, "method": "GET", "host": "api.example.com", "pathWithQuery": "/users", "statusCode": 200, "duplicate": false},
    {"index": 1, "method": "POST", "host": "api.example.com", "pathWithQuery": "/users", "statusCode": 201, "duplicate": false}
  ],
  "hosts": ["api.example.com"],
  "methods": ["GET", "POST"]
}
For file types that do not support preview (RAML, WireMock ZIP), the response returns
{"previewSupported": false}.
To import only specific entries, send a POST request to
/http/management/importSelectedEntries with the file and filter parameters:
# Import specific entries by index (from the preview response)
curl -X POST http://localhost:8080/http/management/importSelectedEntries \
  -F "file=@capture.har" \
  -F "selectedIndices=0,2,5"

# Import entries matching filter criteria
curl -X POST http://localhost:8080/http/management/importSelectedEntries \
  -F "file=@capture.har" \
  -F "hostFilter=api.example.com,auth.example.com" \
  -F "methodFilter=GET,POST" \
  -F "statusFilter=2xx,4xx" \
  -F "urlFilter=/api/v1,/users"
Available filter parameters (all accept comma-separated values):
| Parameter | Description |
|---|---|
selectedIndices |
Entry indices from the preview response (e.g. 0,2,5). Takes precedence over other filters. |
hostFilter |
Include only entries matching these hosts (e.g. api.example.com,auth.example.com) |
methodFilter |
Include only entries matching these HTTP methods (e.g. GET,POST) |
statusFilter |
Include only entries matching these status ranges (e.g. 2xx,4xx) |
urlFilter |
Include only entries whose URL contains one of these substrings (e.g. /api/v1,/users) |
Filters combine with AND logic across filter types and OR logic within
each filter type. For example, hostFilter=api.example.com&methodFilter=POST,PUT
imports POST and PUT requests to api.example.com.
If no filter parameters or indices are provided, all entries are imported.
When importing from a specification format such as Swagger or OpenAPI, it is possible to use dynamic responses in the example responses in the specification.
Dynamic responses typically result in usage of the {{...}} notation that is not valid JSON or YAML. In these cases, you will need to specify the response as an escaped string when using JSON or YAML based import formats such as Swagger and OpenAPI.
You can find examples of dynamic OpenAPI responses in the examples project.
Traffic Parrot also supports selecting the response to return using a special test request header
x-traffic-parrot-select-response-status
that contains the status code of the response to return.
In this way, you can define OpenAPI examples for each status code, and then when you import them into Traffic Parrot, you can select a response by providing the test header with the response status code.
For example:POST /example HTTP/1.1
x-traffic-parrot-select-response-status: 400
HTTP/1.1 400 Bad Request
{
"example": "Message from OpenAPI example"
}
This feature can be enabled in trafficparrot.properties by setting:trafficparrot.openapi.import.mode=SELECT_RESPONSE_STATUS trafficparrot.openapi.skeletons.mode=SELECT_RESPONSE_STATUS
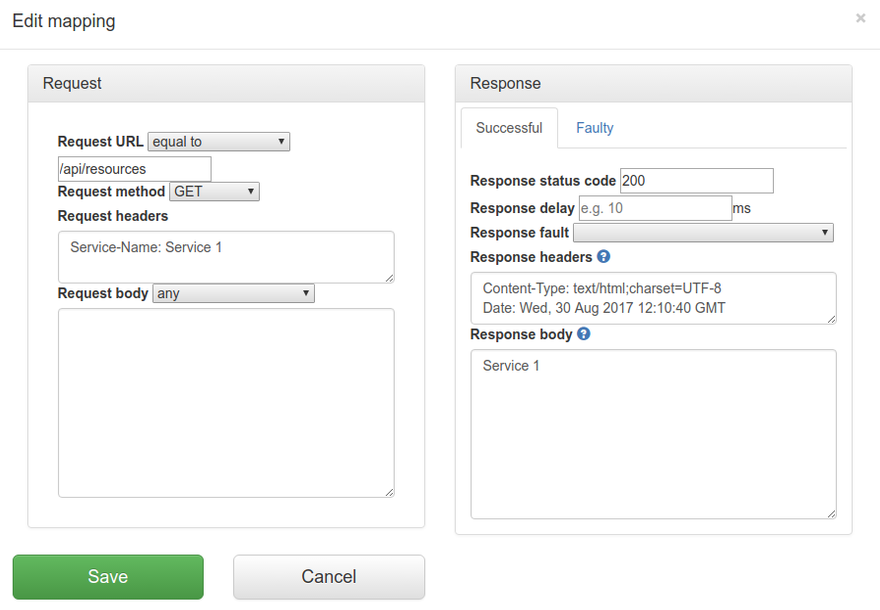
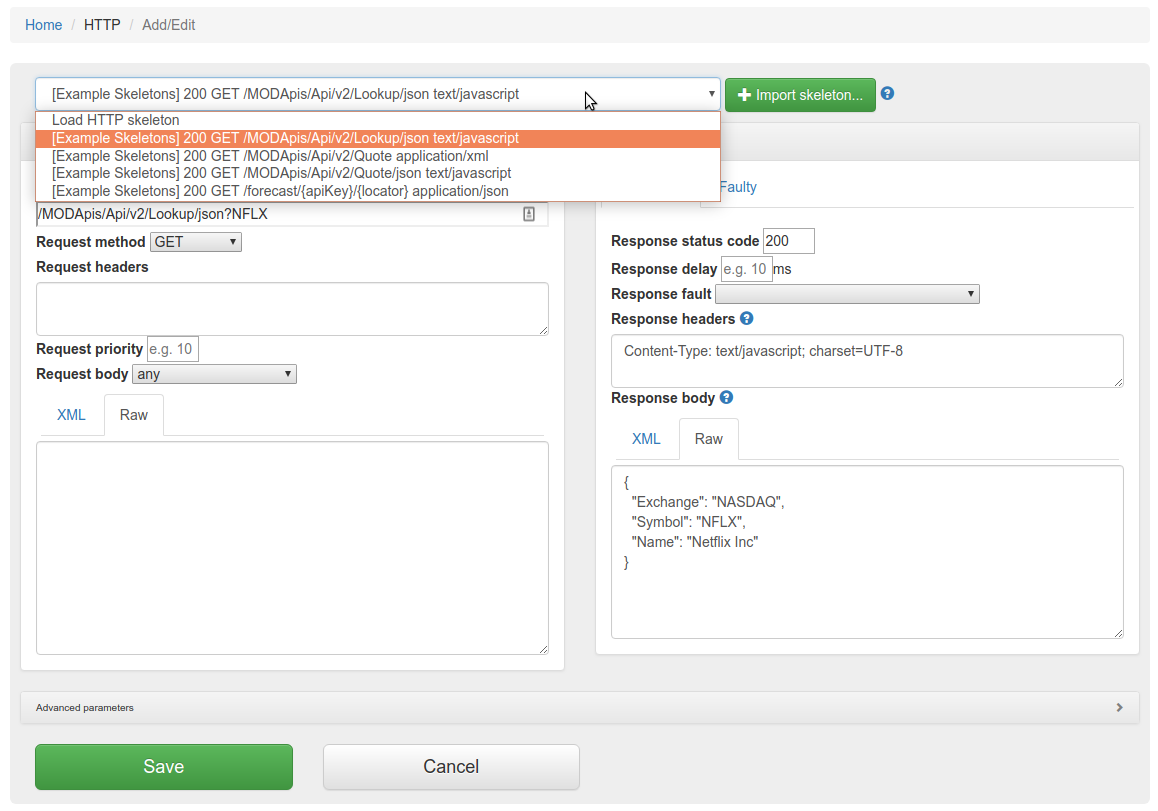
First, go to HTTP in the top navigation bar and then click Add/Edit.
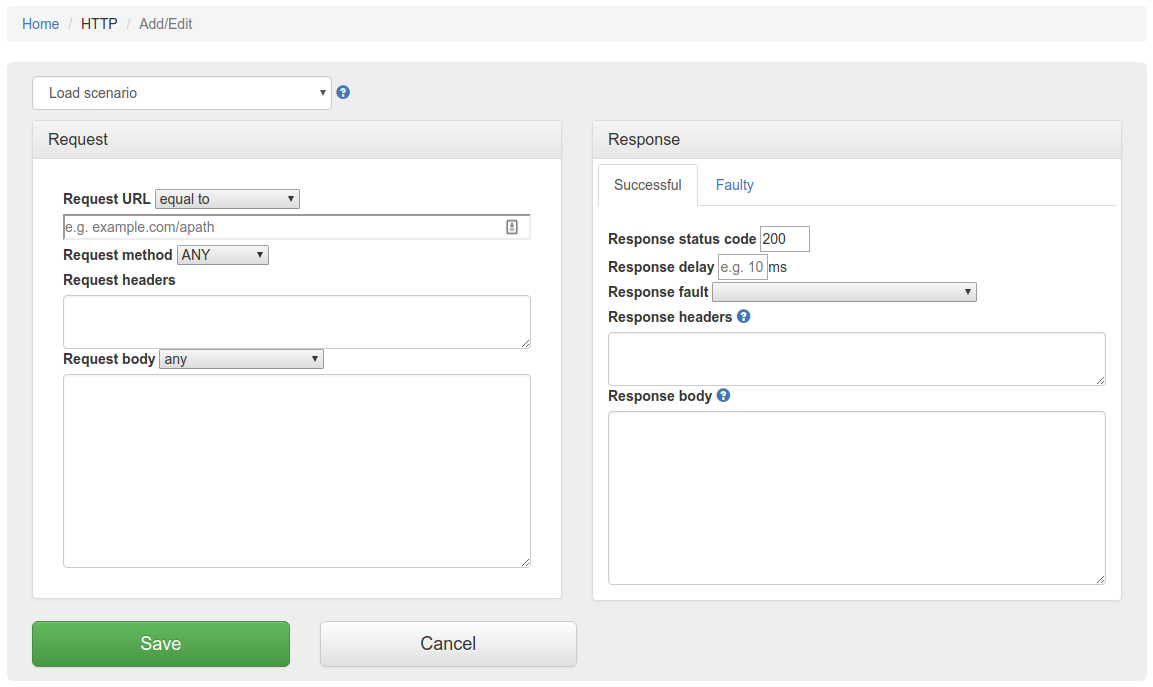
Fill in the Request/Response fields and click Save to configure a mapping.
You can also select from the HTTP skeleton dropdown which will populate the Request/Response fields for that skeleton.
After saving the mapping, it will appear in the list of mappings.

Clicking the edit button  will
allow you to edit an existing mapping.
will
allow you to edit an existing mapping.
The request priority can be set in order to set up a preference order for matching mappings. This works in the same way that priority works in WireMock.
The highest priority value is 1. If two or more mappings both match a request, the mapping with the higher priority will be used to provide the response. The default priority is 5.
This can be useful, if you want a "catch-all" mapping that returns a general response for most requests and specific mappings on top that return more specific responses.
You can temporarily disable a mapping without deleting it. Disabled mappings remain in the mapping list but are skipped during request matching, so no incoming request will match them.
In the mapping list, each mapping has a toggle button (eye icon) in the actions column. Click the toggle to disable a mapping. The mapping row appears dimmed to indicate it is disabled. Click the toggle again to re-enable it.
This is useful for:
The enable/disable state is stored in the mapping's metadata as
tp.enabled. Mappings without this metadata field default to
enabled, so existing mappings are not affected.
Traffic Parrot supports responding with a HTTP response including headers, body and status code, from another HTTP server.
This can be used to forward the requests you don't have mappings for to another endpoint.
You can use this to provide a default response for unmatched requests:
Alternatively, you can configure automatic passthrough for all unmatched requests using the HTTP Passthrough Proxy property. This creates the catch-all proxy mapping automatically on startup.
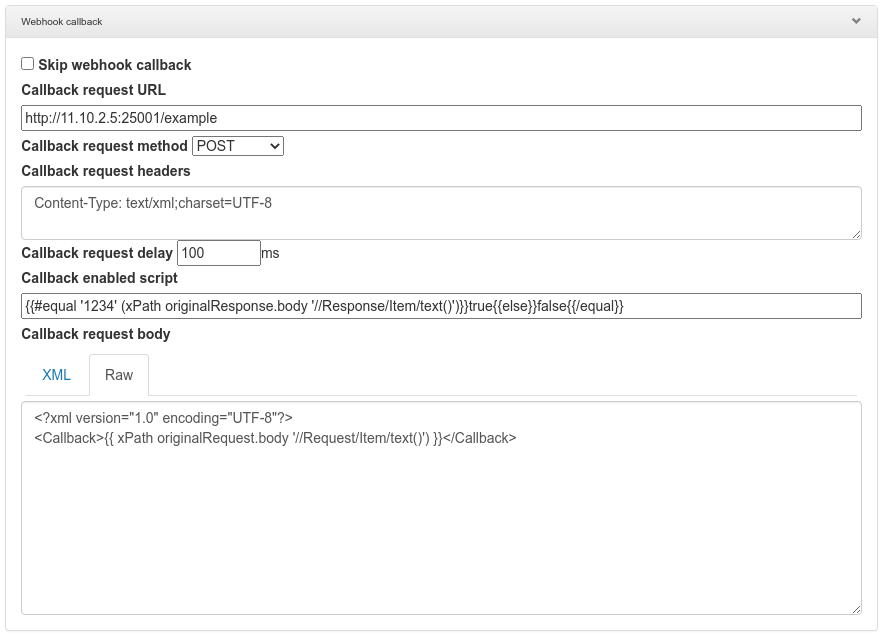
Traffic Parrot can also be configured to send an additional HTTP request after the mock response has been returned. This is called HTTP webhooks or callbacks.
It is possible to enable the callback based on a script evaluation condition. For example, this can be used to only send the callback if the mock response contains a particular success code.
Another way to match HTTP requests is with a request matcher script. If the expression evaluates to true, then the request is matched, otherwise it is not matched.
For example, Handlebars templating can be used to match a request header using a regular expression: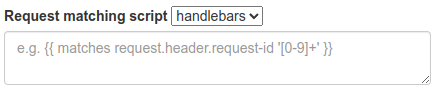
HTTP skeletons offer a quick way to generate a template of a mapping that matches an endpoint defined in an OpenAPI specification file. We may also add support for other specifications e.g. RAML in the future.
In order to edit the list of elements on the HTTP skeletons dropdown on the Add/Edit page you will need to place OpenAPI specifications into the file trafficparrot-x.y.z/openapi configuration directory. JSON and YAML OpenAPI files are supported.
Alternatively, you can use the  button to import OpenAPI files. If you import a file with the same name
as a file that was previously imported, it will be overwritten.
button to import OpenAPI files. If you import a file with the same name
as a file that was previously imported, it will be overwritten.
Traffic Parrot can validate your HTTP mappings against OpenAPI specification files at startup. This helps you detect drift between your API specifications and your virtual service mappings — for example, when an endpoint is renamed or removed from the specification but the corresponding mapping is not updated.
When enabled, Traffic Parrot checks that each HTTP mapping's URL path and HTTP method match an operation defined in at least one of the loaded OpenAPI specification files. If any mappings reference endpoints not found in the specifications, startup is prevented and detailed error messages are logged.
To enable the OpenAPI schema check, set the following property in trafficparrot.properties:
trafficparrot.virtualservice.openapi.check.mapping.schema.on.startup=true
By default this property is set to false, so the check does not
run and existing behaviour is unchanged.
Place your OpenAPI specification files (JSON or YAML, versions 2.x and 3.x) in the scenarios/{scenario}/openapi/ directory. If multiple specification files are present, all operations from all files are aggregated before the check runs.
If no OpenAPI specification files are found, the check passes silently and startup proceeds as normal.
ANY method are skippedWhen violations are found, Traffic Parrot prevents startup and logs detailed error messages including the mapping ID, URL, HTTP method, and the reason for the mismatch. This is similar to the gRPC schema check feature.
Traffic Parrot helps with SOAP and XML mocking by providing an XML editor, the matchesXML request body matcher and dynamic response helpers such as xPath and xPathList.
Please see the video below for a full demo of recording SOAP requests and responses, and then generating dynamic responses.
Please download Traffic Parrot and the sample UV Index SOAP application and follow the demo in the video below.
If your system requires the use of an outbound HTTP proxy (e.g. in a corporate environment) you will need to make sure Traffic Parrot was started using those proxy settings so that it can correctly record. See the configuration guide HTTP proxy settings.
If you need to record a system with a certificate that is not trusted by default, you will need to specify the trust store properties. See the configuration guide Outbound HTTPS certificates.
If you need to record a system that requires a client certificate for authentication, you will need to specify the key store properties. See the configuration guide Outbound HTTPS certificates.
First, navigate to the recording page by clicking HTTP in the top navigation bar and then click Record.
In order to record traffic to a URL, simply enter the Recording URL and click Start recording.
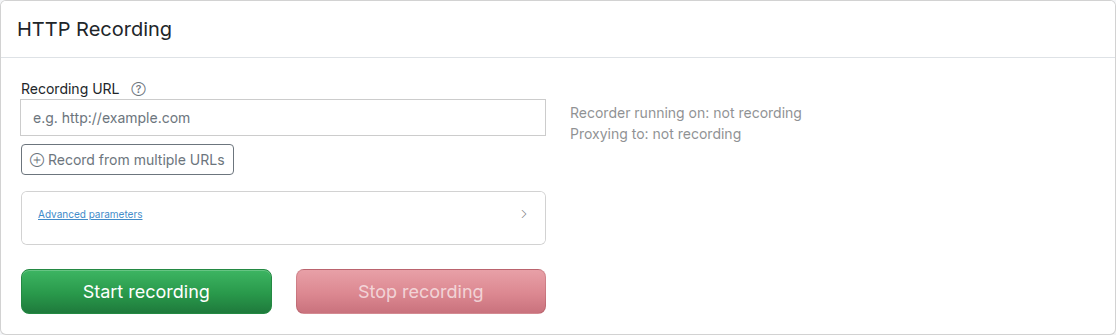
All traffic received by the Traffic Parrot virtual service will be proxied to the host in the Recording URL and recorded as mappings.
Clicking the edit button will
allow you to edit the recorded mapping.
If there are existing mappings present before a recording starts, these mappings will be used to return responses instead of recording a new response.
For example, if there is a mapping with path equal to /example then any traffic to path /example will return a response from the existing mapping and traffic to other paths will still be recorded.
If the Recording URL includes a path, only traffic to this path will be recorded, however all traffic will still be proxied.
For example, if the Recording URL is set to http://example.com/aSampleResource then only traffic to paths staring with /aSampleResource will be recorded and all other traffic will be proxied to http://example.com without saving mappings.
By default the Record page shows a single Recording URL input for the common case of recording one backend. To record from multiple backends in a single session, click Record from multiple URLs below the input. This reveals a URL pattern field alongside the target field and adds a second row so you can route different paths to different backends. Use Add proxy target to add more rows, or click the remove button on a row to delete it. Removing rows until only one row remains with an empty pattern returns the form to the simple single-URL mode.
Each row consists of a URL pattern (a regular expression matched against the request path) and a target URL. For example:
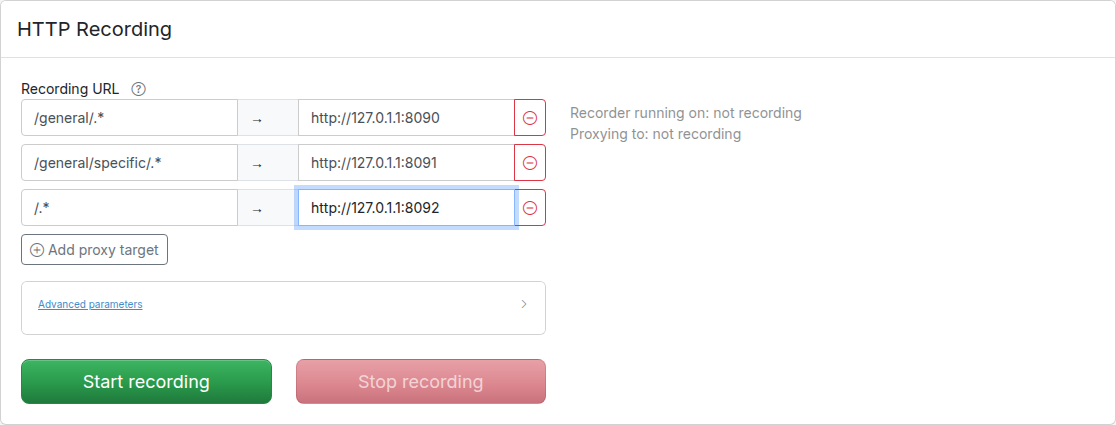
The path is used to determine which API should be used to provide the recorded response. The expression .* is used as a wildcard matcher.
In the example above: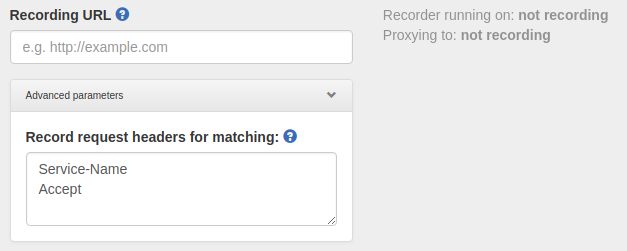
Traffic Parrot can automatically rewrite URLs in response bodies during recording. This is useful when recording from production systems where responses contain absolute URLs that need to be changed to point to your test environment.
Configure URL rewriting by setting the trafficparrot.http.recording.rewrite.regex
property in trafficparrot.properties. The format is:
trafficparrot.http.recording.rewrite.regex=pattern->replacement,pattern2->replacement2Simple string replacement:
trafficparrot.http.recording.rewrite.regex=https://api.example.com->http://localhost:8081Regex with capture groups:
trafficparrot.http.recording.rewrite.regex=(https?://[^/]+)(.*)->http://localhost:8081$2Multiple rules:
trafficparrot.http.recording.rewrite.regex=(https://api.example.com)(.*)->http://localhost:8081$2,(https://cdn.example.com)(.*)->http://localhost:8082$2URL rewriting only applies during recording. The transformed URLs are saved in the recorded response files, so during replay mode, the already-transformed responses are served.
When Traffic Parrot receives a request, it will try to simulate the system it is replacing by sending back a response to the client that sent the request. To decide which response to send, it will go through all the request to response mappings it has available to find the response to be returned. For more details how request matching works, see Request matching.
There are several matchers available to match HTTP requests, depending on the attribute.
The most common matchers are shown below. All other WireMock request body patterns are also supported.
| Matcher name | Matcher Id | Description |
|---|---|---|
| equal to | urlEqualTo | Check that the whole url (including query parameters, etc.) of the request received is equal to the url specified in the mapping |
| matches regex | urlMatching | Check that the url of the request received matches the regexp specified in the mapping |
| path equal to | urlPathEqualTo | Check that the url path of the request received is equal to the path specified in the mapping |
| path matches regex | urlPathMatching | Check that the url path of the request received matches the path specified in the mapping |
| Matcher name | Description |
|---|---|
| ANY | When matching a request, do not pay attention to the request method |
| GET | Check that the method of the request received is GET |
| POST | Check that the method of the request received is POST |
| PUT | Check that the method of the request received is PUT |
| HEAD | Check that the method of the request received is HEAD |
| OPTIONS | Check that the method of the request received is OPTIONS |
| DELETE | Check that the method of the request received is DELETE |
| CONNECT | Check that the method of the request received is CONNECT |
| TRACE | Check that the method of the request received is TRACE |
Request headers are specified as a newline-separated list of header names and values. By default, each header uses an equalTo matcher:
Accept: text/html
Accept-Encoding: gzip, deflate
Accept-Language: en-US,en;q=0.5
You can also specify a matcher type by adding a [matcherType] suffix to the header name. The following matcher types are supported:
| Matcher type | Format | Description |
|---|---|---|
| equalTo (default) | Header-Name: value | Header value must be exactly equal to the specified value |
| contains | Header-Name [contains]: value | Header value must contain the specified substring |
| matches | Header-Name [matches]: regex | Header value must match the specified regular expression |
| doesNotMatch | Header-Name [doesNotMatch]: regex | Header value must not match the specified regular expression |
For example, to match requests where X-Custom contains the word "partial" and X-Id matches a numeric pattern:
X-Custom [contains]: partial
X-Id [matches]: [0-9]+
| Matcher name | Matcher Id | Description |
|---|---|---|
| any | any | Any request body will match. |
| equal to | equalTo | Check that the received request body is equal to the request body specified in the mapping |
| contains | contains | Check that the received request body contains the sequence of characters specified in the mapping |
| does not contain | doesNotContain | Check that the received request body does not contain the sequence of characters specified in the mapping |
| matches regex | matches | Check that the received request body matches the regexp specified in the mapping |
| does not match regexp | doesNotMatch | Check that the received request body does not match the regexp specified in the mapping |
| equal to JSON | equalToJson | Check that the received request body is JSON and that it is equal to the request body JSON specified in the mapping |
| matches JSON | matchesJson |
Check that the received request body matches (allowing for special wildcard tokens) JSON specified in the mapping.
Tokens allowed:
For example a "matches JSON" request body matcher:
{
  "name": "{{ anyValue }}",
  "lastName": "{{ anyValue }}",
  "age": "{{ anyNumber }}",
  "children": "{{ anyElements }}"
}
will match a request body:
{
  "name": "Bob",
  "lastName": "Smith",
  "age": 37,
  "children": [{"name": "sam"}, {"name": "mary"}]
}
|
| matches JSONPath | matchesJsonPath | Check that the received request body is JSON and that it matches JSONPath
specified in the mapping. For example, if we use the following expression as the request body matcher
$[?(@.xyz.size() == 2)]it will match this request body: {"xyz":[{"a":true}, {"b":false}]}
but will NOT match this one:
{"xyz":["a":true, "b":false, "c":true]}
For more examples see the request matching documentation.
|
| equal to XML | equalToXml | Check that the received request body is XML and that it is equal to the request body XML specified in the mapping |
| matches XML | matchesXml |
Check that the received request body matches (allowing for special wildcard tokens) XML specified in the mapping.
Tokens allowed:
For example a matches XML request body matcher:
<example>
  <name>{{ anyValue }}</name>
  <age>{{ anyNumber }}</age>
  <children><tp:AnyElements/></children>
</example>
will match a request body:
<example> <name>Sam</name> <age>29</age> <children><child name="bob"/></children> </example> |
| matches XPath | matchesXPath | Check that the received request body is XML and that it matches XPath
specified in the mapping. For example, if we use the following expression as the request body matcher
/xyz[count(abc) = 2]it will match this request body: <xyz><abc/><abc/></xyz>but will NOT match this one: <xyz><abc/></xyz> |
The following additional matchers are available when editing mapping JSON files directly:
When using Traffic Parrot to simulate multiple HTTP services at the same time, you may encounter namespace issues if the services have name clashes in the context path.
For example, you may have two services that both have a GET /api/resources endpoint, and one might be hosted at http://service1/api/resources and the other at http://service2/api/resources.
The Traffic Parrot virtual service http://localhost:8081/api/resources would have two mappings associated with it.
There are a number of ways to deal with this situation, one of which is detailed below.
One solution to having the same name resource URL /api/resources for different services is to make a change the system under test and start sending a custom header when communicating with those services. For example, a request to http://service1/api/resources could include a HTTP header Service-Name: service1, and a request to http://service2/api/resources could include a HTTP header Service-Name: service2. That way the HTTP requests are different and Traffic Parrot can map them to different responses.
If you would like to capture those headers during a recording, you need to tell Traffic Parrot to record those headers.
You can also add those headers manually by editing the mapping.
The simplest way to create a mock in Traffic Parrot that returns a binary file in the response is to create that mock by doing a recording. That assumes you have a real service that you can record. Refer to the recording section on how to create HTTP mocks using the recorder.
If you don't have a real service that returns the binary file in the response, you can create a mapping manually.
{
  "id": "5d6a8f32-914c-4b67-ae15-f2c9d7b3e091",
  "name": "mapping-dummy-file.json",
  "request": {
    "url": "/dummy.pdf",
    "method": "GET"
  },
  "response": {
    "status": 200,
    "bodyFileName": "body-dummy-file.pdf",
    "headers": {
      "Content-type": "application/pdf"
    }
  }
}Here are three options you have if you would like to serve static images in Traffic Parrot.
You can download sample mappings here: static_images_sample_mappings.zip
Use a single placeholder image for all image requests. This is ideal for basic testing where the actual image content doesn't matter (e.g., http://localhost:8080/images/any-skirt.jpg).
{
  "id": "a1b2c3d4-e5f6-7890-abcd-ef1234567890",
  "name": "Generic Image Response",
  "request": {
    "method": "GET",
    "urlPattern": "/images/.*"
  },
  "response": {
    "status": 200,
    "bodyFileName": "sample-image.jpg",
    "headers": {
      "Content-Type": "image/jpeg",
      "Cache-Control": "public, max-age=3600"
    }
  },
  "uuid": "a1b2c3d4-e5f6-7890-abcd-ef1234567890",
  "priority": 5
}
Serve different images based on URL patterns, useful when your application expects images of specific dimensions. You can create these using tools like ImageMagick on a Mac or any image editor (e.g., http://localhost:8080/images/320x240-skirt.jpg).
{
  "id": "b2c3d4e5-f6a7-8901-cdef-012345678902",
  "name": "320x240 Image Response",
  "request": {
    "method": "GET",
    "urlPattern": "/images/320x240.*"
  },
  "response": {
    "status": 200,
    "bodyFileName": "sample-image-320x240.jpg",
    "headers": {
      "Content-Type": "image/jpeg",
      "Cache-Control": "public, max-age=3600"
    }
  },
  "uuid": "b2c3d4e5-f6a7-8901-cdef-012345678902",
  "priority": 1
}
{
  "id": "b1c2d3e4-f5a6-7890-bcde-f12345678901",
  "name": "640x480 Image Response",
  "request": {
    "method": "GET",
    "urlPattern": "/images/640x480.*"
  },
  "response": {
    "status": 200,
    "bodyFileName": "sample-image-640x480.jpg",
    "headers": {
      "Content-Type": "image/jpeg",
      "Cache-Control": "public, max-age=3600"
    }
  },
  "uuid": "b1c2d3e4-f5a6-7890-bcde-f12345678901",
  "priority": 1
}
Use actual images from your application, either recorded during a session or manually configured. This provides the most accurate simulation (e.g., http://localhost:8080/images/product-123.jpg).
{
  "id": "c1d2e3f4-a5b6-7890-def1-123456789012",
  "name": "Product 123 Image Response",
  "request": {
    "method": "GET",
    "url": "/images/product-123.jpg"
  },
  "response": {
    "status": 200,
    "bodyFileName": "images/product-123.jpg",
    "headers": {
      "Content-Type": "image/jpeg",
      "Cache-Control": "public, max-age=86400",
      "ETag": "\"3e25960a79dbc69b674cd4ec67a72c62\""
    }
  },
  "uuid": "c1d2e3f4-a5b6-7890-def1-123456789012",
  "priority": 1
}
The HTTP passthrough proxy lets you forward requests that do not match any stub mapping to a real backend service. This is useful during development when you want to selectively mock only certain endpoints while letting all other traffic pass through to the real system.
When passthrough is enabled, Traffic Parrot automatically creates a low-priority catch-all proxy mapping on startup. Any request that does not match a higher-priority stub is forwarded to the configured target URL, and the real response is returned to the caller.
You can then inspect proxied requests in the Request Log and create stubs from them with a single click, allowing you to incrementally build up your virtual service.
To enable passthrough proxy mode, set the
trafficparrot.virtualservice.proxy.defaultTargetUrl property
to the base URL of the real backend service. You can set this in
trafficparrot.properties or as a system property (e.g. via
-Dtrafficparrot.virtualservice.proxy.defaultTargetUrl=http://backend:8080).
For example:
trafficparrot.virtualservice.proxy.defaultTargetUrl=http://my-backend:8080
On startup, Traffic Parrot creates a catch-all proxy mapping named "Default proxy to http://my-backend:8080" with priority 10. Because user-created stubs use default priority 5 (which is higher), any stub you create will automatically take precedence over the proxy.
The auto-created proxy mapping is visible in the HTTP Add/Edit mappings list. It cannot be edited or deleted from the UI because it is managed by the property. An info button appears in the actions column explaining the configuration.
To change the target URL, update the property value and restart Traffic Parrot. To remove passthrough entirely, clear the property value and restart.
To temporarily disable passthrough without removing the target URL configuration,
set the trafficparrot.virtualservice.proxy.enabled property
to false:
trafficparrot.virtualservice.proxy.enabled=false
When disabled, the auto-proxy mapping is not created on startup even if
defaultTargetUrl is set. Requests that do not match any stub
will return an unmatched response (status 900) instead of being forwarded.
The default value is true, so passthrough is enabled whenever
defaultTargetUrl is configured.
When passthrough proxy mode is active, proxied requests appear in the Request Log with a blue "Proxied" badge in the Matched column instead of the green "Yes" badge. Hovering over the badge shows a tooltip with the proxy target URL (e.g. "Proxied to http://my-backend:8080").
This visual distinction makes it easy to see which requests were handled by stub mappings and which were forwarded to the real backend.
Each proxied request in the request log has a "Create Stub" button in its expanded detail view. Clicking it creates a new stub mapping based on the captured request and the actual response from the backend.
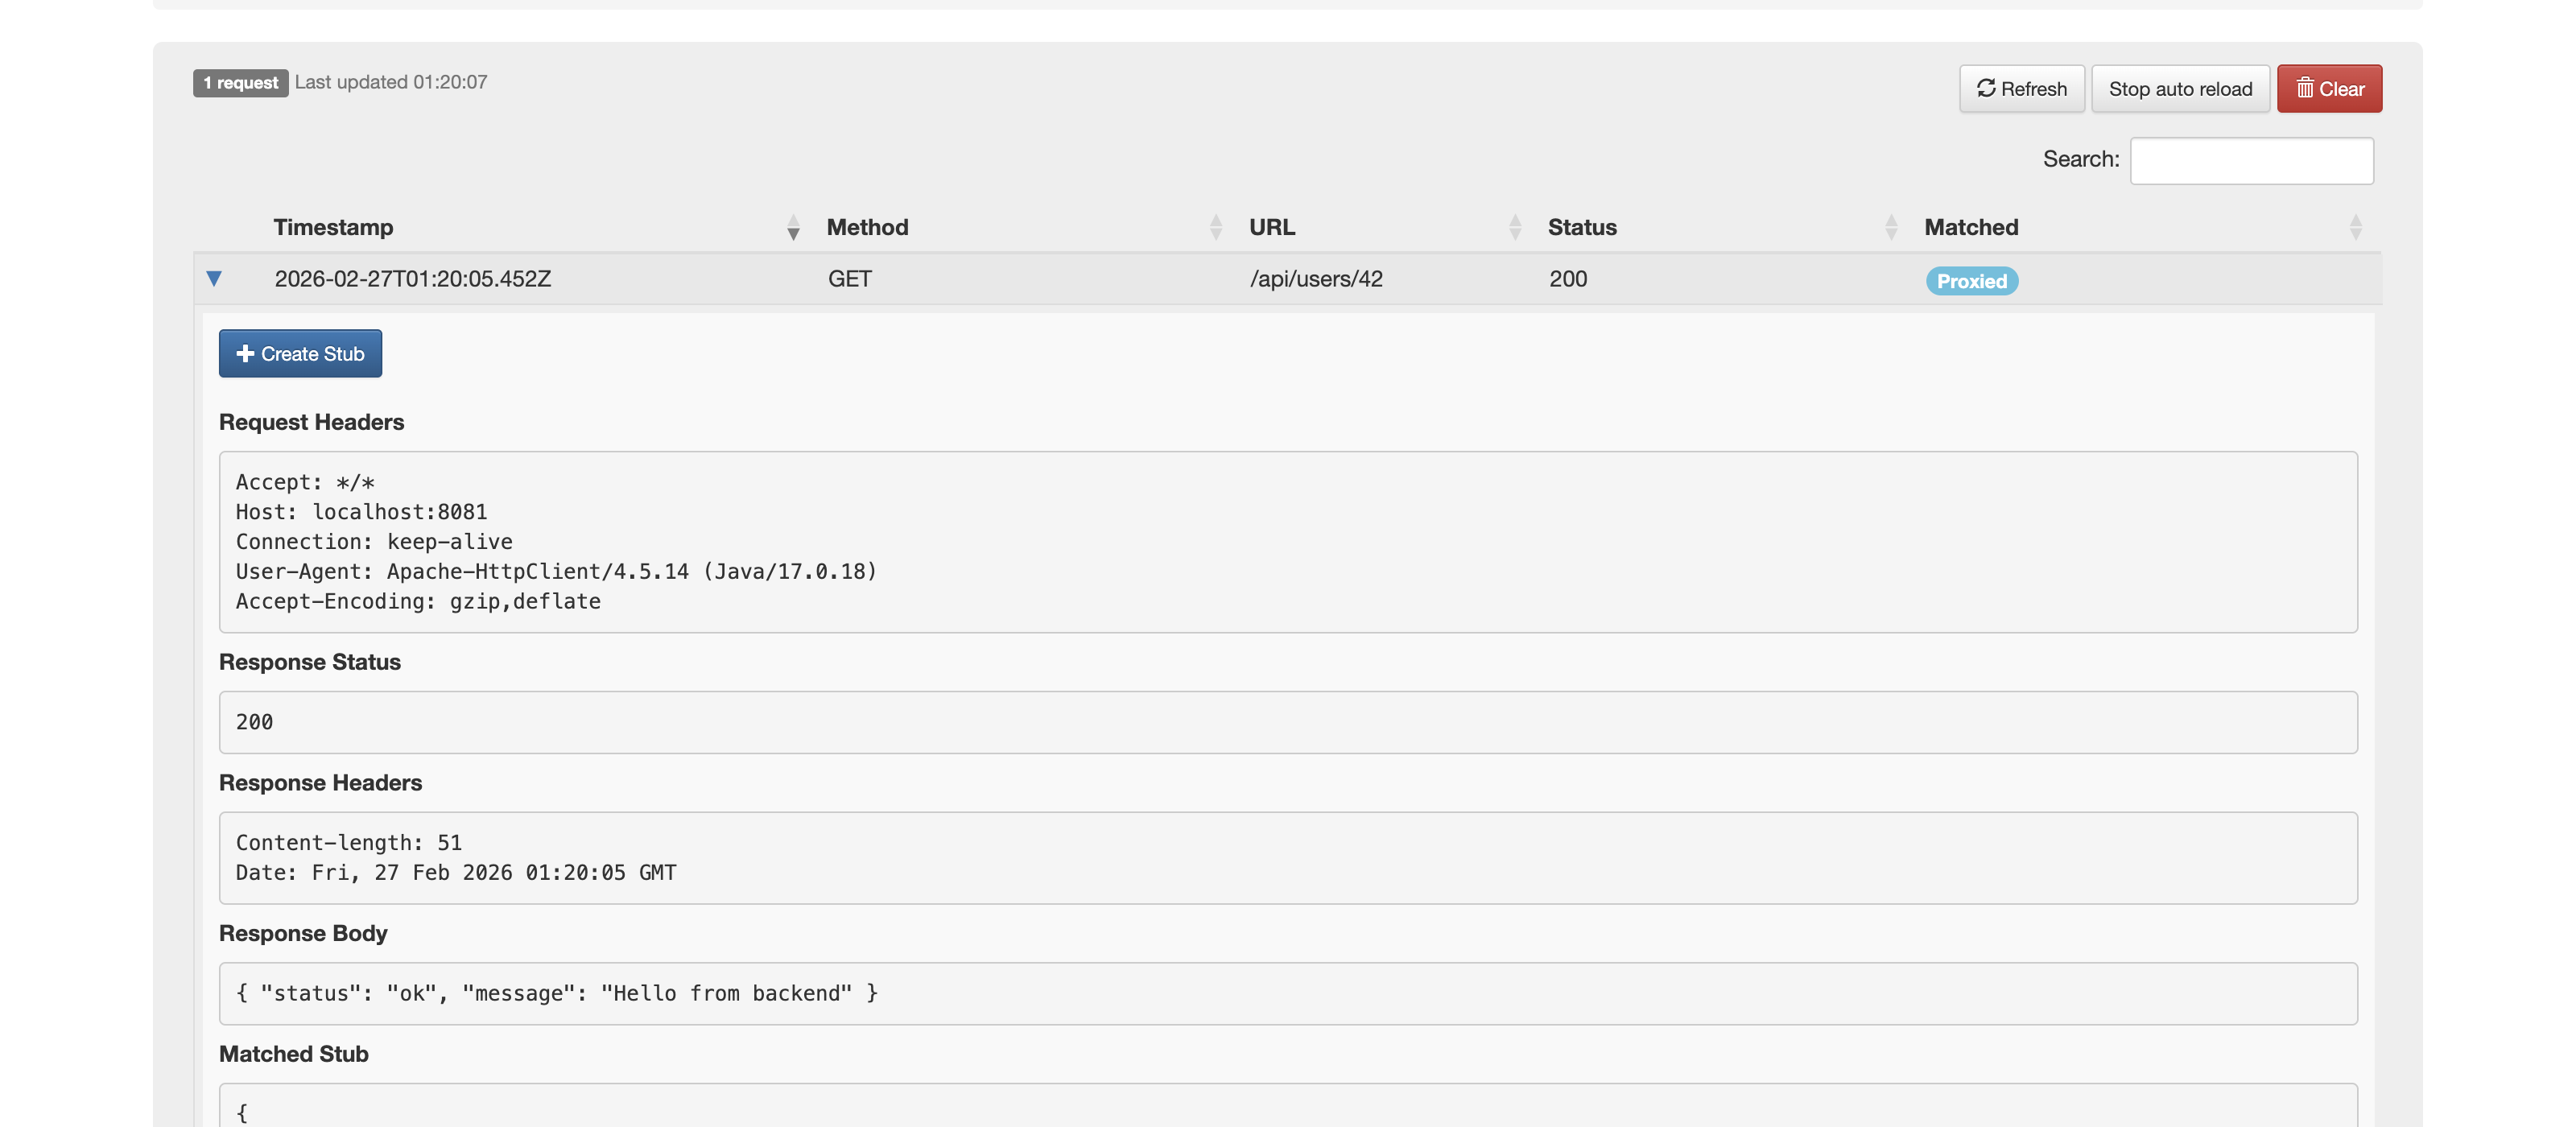
The created stub uses:
urlEqualTo)
Transport-specific headers such as Host, Connection,
Transfer-Encoding, and Content-Length are automatically
excluded from the stub because they are managed by the HTTP transport layer.
After the stub is created, a green notification appears with the message "Stub created for GET /your-path" (showing the actual method and URL). The notification includes a "View in Add/Edit" link that takes you to the HTTP Add/Edit page and opens the mapping editor for the new stub, where you can review and adjust the stub before use.
Once the stub is saved, subsequent requests to the same URL will be served by the static stub instead of being proxied to the backend. This allows you to incrementally build up your virtual service by exercising your application normally and converting real responses into stubs one at a time.
The "Create Stub" button only appears for proxied requests. It is not shown for requests that matched an existing stub or for unmatched requests.
A HTTP proxy is a browser or operating system level configuration that routes HTTP traffic via a configured HTTP proxy server.
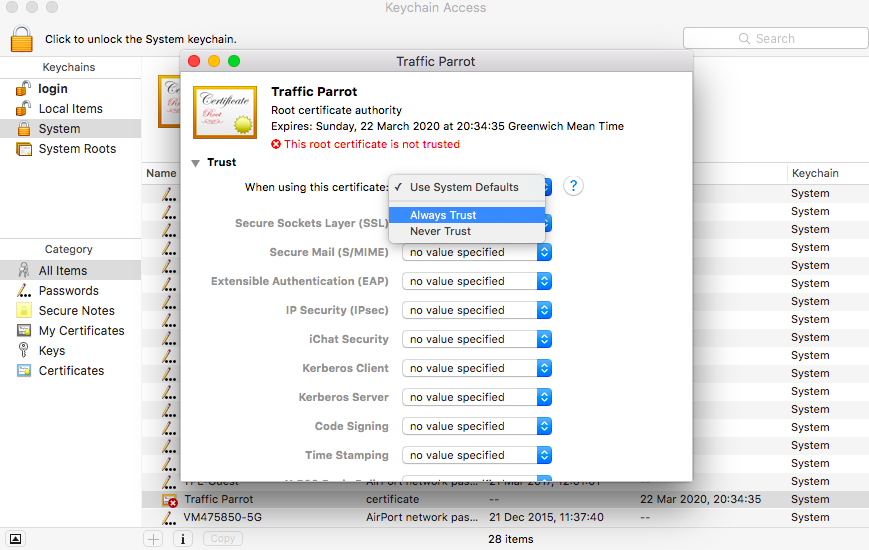
To use Traffic Parrot as a HTTP proxy you need to install the Traffic Parrot CA certificate in your system.
Traffic Parrot HTTP proxy can be set to record or replay mode. Both use the same port of 8095 by default.
In record mode, HTTP requests and responses that pass through the proxy to remote hosts will be saved in mapping files.
In replay mode, mappings previously recorded will be used to provide HTTP responses for any incoming requests.
Please consult your browser or operating system documentation for instructions on how to configure a HTTP proxy, including how to trust CA certificates and disable security such as HSTS that usually protects against MITM proxy usage.
You can use the hostname localhost and port 8095 to configure a local HTTP proxy with a local Traffic Parrot.
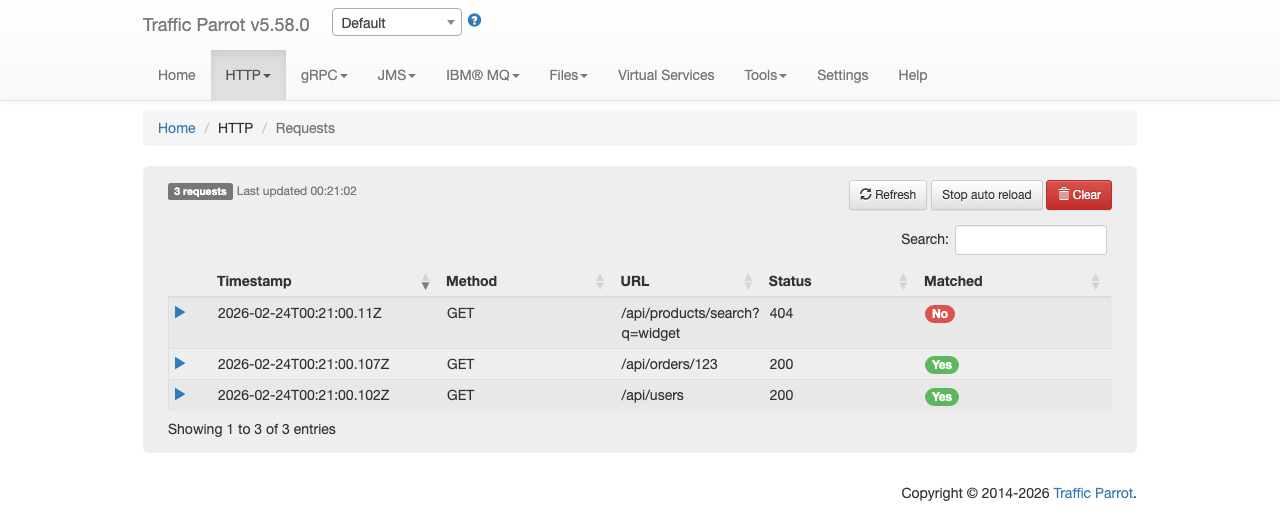
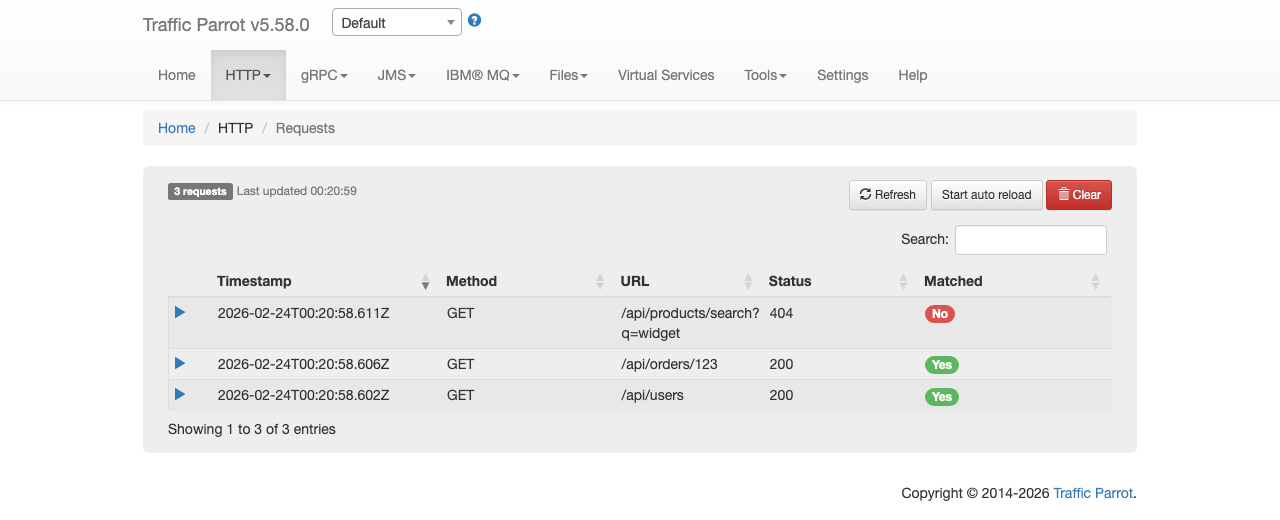
The Request Log page shows all HTTP requests received by the virtual service. You can access it from the HTTP dropdown menu in the top navigation bar by clicking "Requests".
Each row in the table displays the request timestamp, HTTP method, URL, response status code, and whether the request was matched to an existing stub mapping. Matched requests show a green "Yes" badge, unmatched requests show a red "No" badge, and proxied requests show a blue "Proxied" badge (see HTTP Passthrough Proxy).
The page header shows the total number of requests and a "Last updated" timestamp indicating when the data was last refreshed.
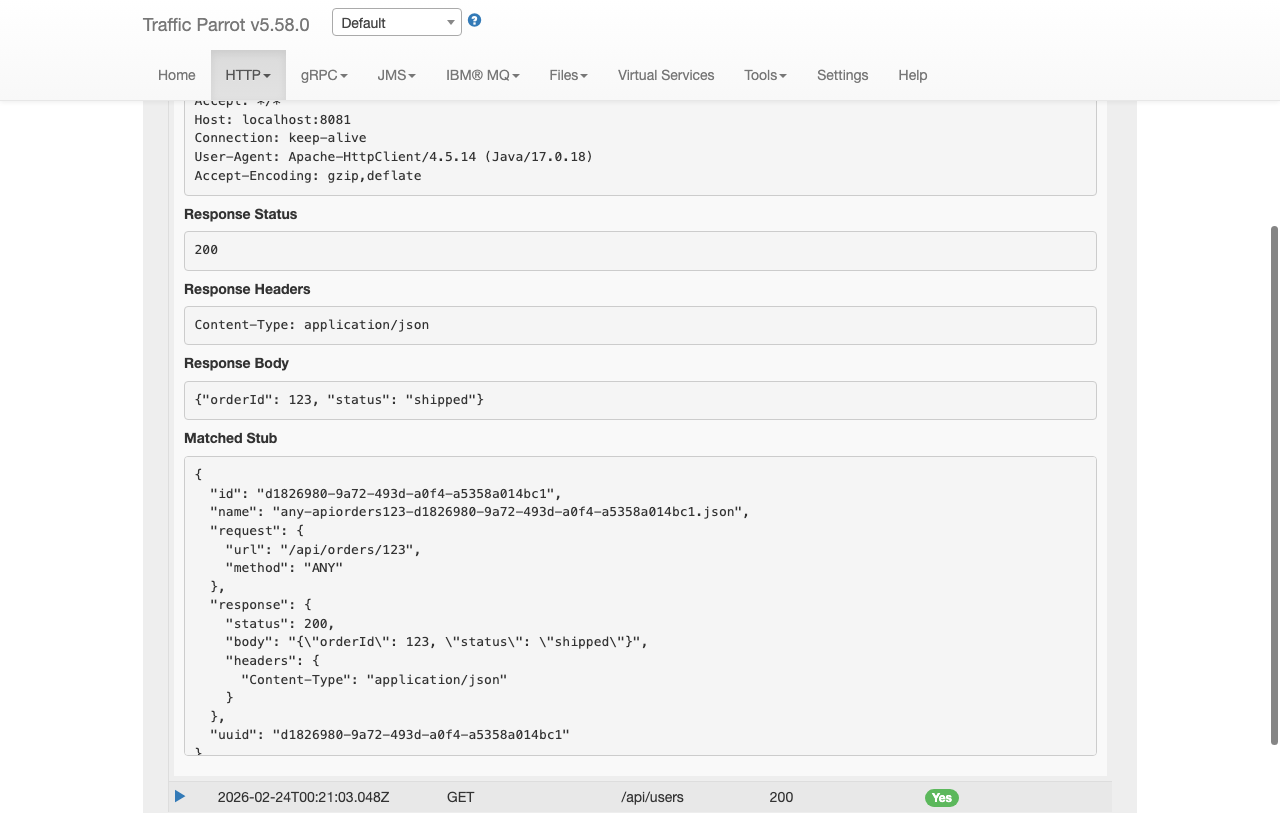
Click the expand arrow on any row to view full details of the request and its response. The expanded section shows the request headers, request body, response status, response headers, and response body.
For matched requests, a "Matched Stub" section displays the full JSON definition of the stub mapping that was used to generate the response. This is useful for understanding which mapping handled the request.
When you expand an unmatched request (one with a red "No" badge), the detail section shows a "Near Misses" list instead of a matched stub. Near misses are the existing stub mappings that came closest to matching the request, along with a percentage indicating how close each match was.
Each near miss displays a per-field comparison table that shows exactly which fields matched and which did not. The table compares the stub's expected values against the actual request values for each field: Method, URL, Headers, and Body.
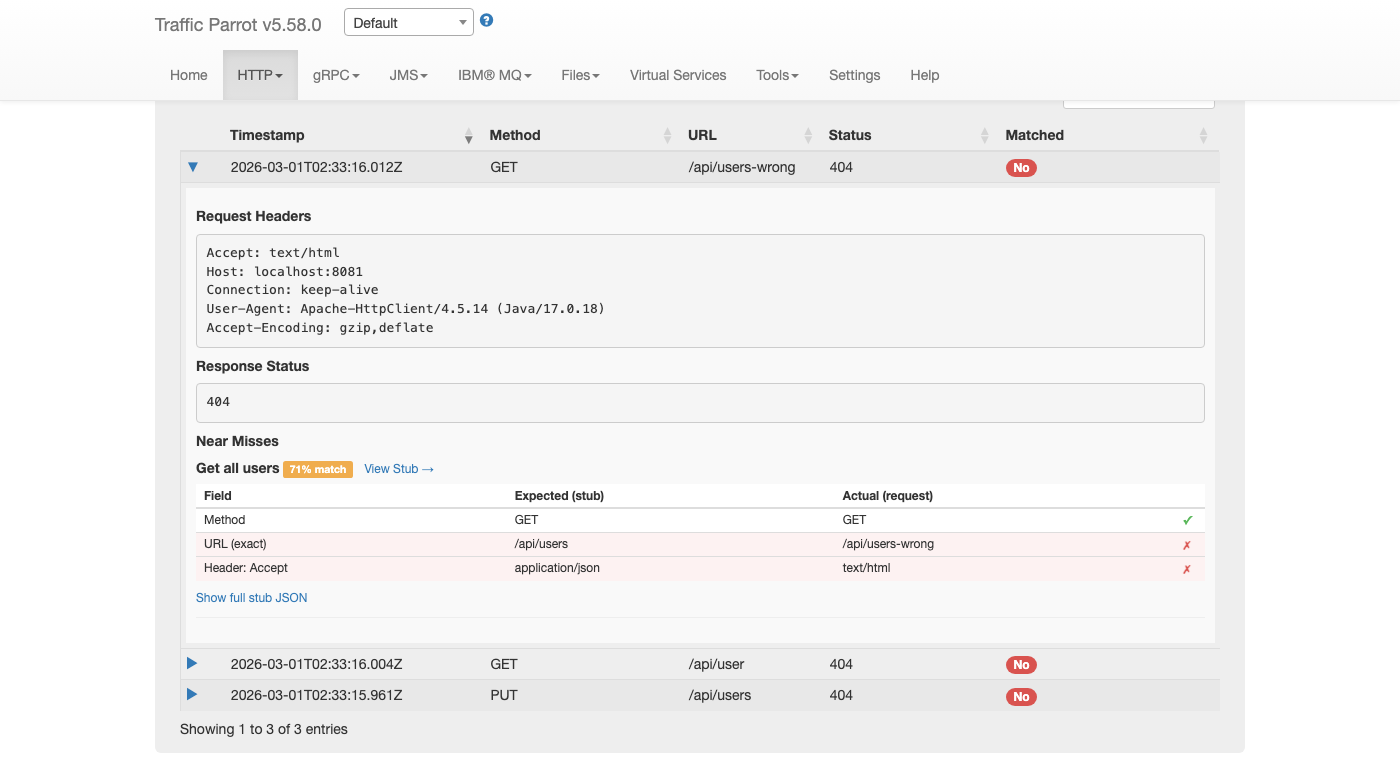
Each row in the comparison table has an indicator on the right:
In the example above, a request to GET /api/users-wrong with an
Accept: text/html header is compared against a stub expecting
GET /api/users with Accept: application/json. The Method
matches (green checkmark), but both the URL and Accept header are mismatched (red crosses),
making it immediately clear why the request was not matched.
Each near miss entry shows the stub's human-readable name as its heading, when one has been set. If the stub does not have a name, the heading displays the stub's method and URL pattern instead. Next to the name, an orange badge shows the match percentage (for example, "92% match"), which indicates how closely the request matched that stub.
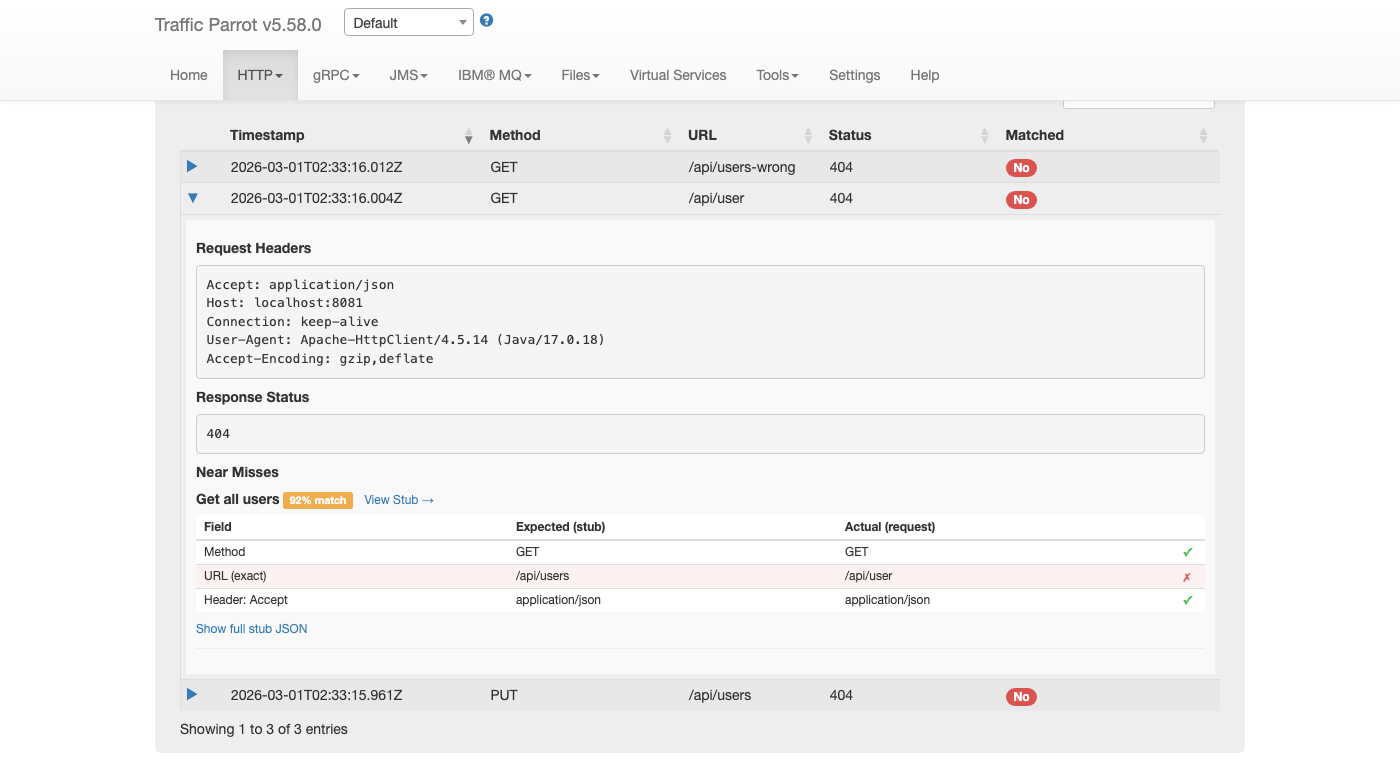
Each near miss entry includes a "View Stub" link next to the stub name. Clicking this link navigates directly to the HTTP Stubs page and opens the edit dialog for that specific stub mapping. This allows you to quickly fix the stub's request pattern when you can see which field did not match.
Below the comparison table, a "Show full stub JSON" link is available for users who need to see the complete stub mapping definition. Clicking this link toggles a collapsible section that displays the raw JSON of the stub, including the response body, metadata, and UUID. This is hidden by default to keep the near miss display focused on the comparison table.
The request log automatically refreshes every second, so new requests appear in the table without requiring a manual page reload. This is useful when monitoring live traffic to the virtual service.
You can pause auto-refresh by clicking the "Stop auto reload" button. When paused, the button changes to "Start auto reload" and no further automatic updates occur until you resume. The manual "Refresh" button continues to work at any time.
Auto-refresh also pauses automatically when you expand a detail row, select text in the table, or hover over a tooltip. This prevents the data from changing while you are inspecting it.
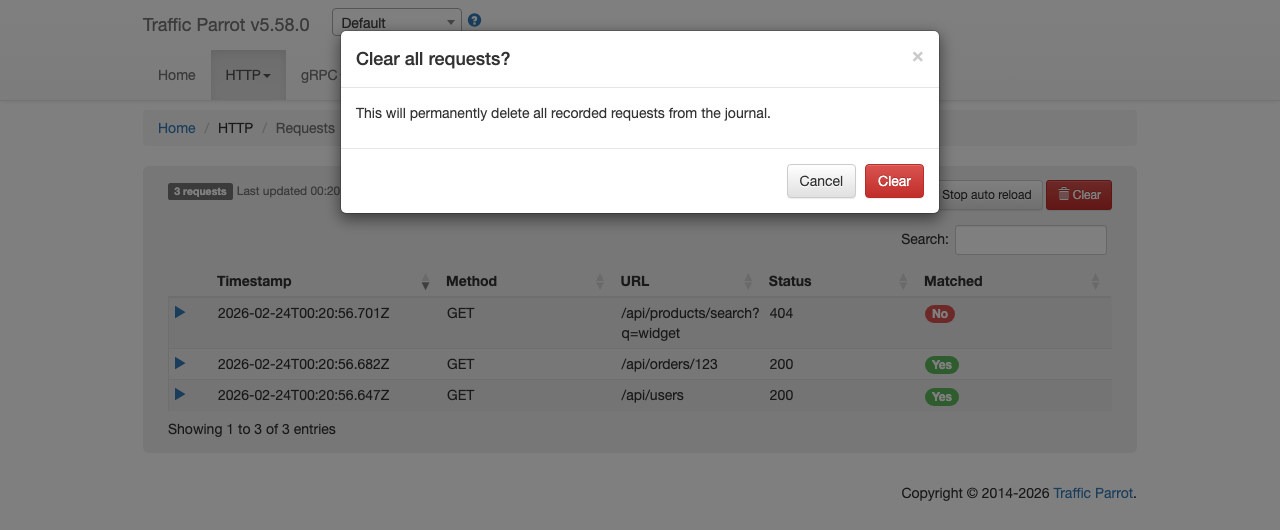
Click the red "Clear" button to delete all recorded requests from the journal. A confirmation dialog appears asking you to confirm before the requests are permanently removed.