Dynamic Responses

« Back to documentation home

Generate responses

You can use several types of extensions to add dynamic content to response headers and response body.

For example, if you create a response with body { "Number": "{{randomInteger}}", "Date": "{{httpNow}}" } it will be rendered as { "Number": "165007562", "Date": "Sat, 02 Apr 2017 18:41:35 GMT" }

Below you will find all available extensions.

Available helpers panel

Traffic Parrot ships a large catalogue of response-templating helpers. To make them easy to discover while you are building a mapping, the mapping editors include an Available helpers panel. You no longer need to leave the product to look up a helper name or its syntax. The same panel is available in the HTTP stub editor and in the messaging (JMS, IBM MQ and file-message) mapping editor.

Open the HTTP stub editor (HTTP » Add/Edit). The panel is a collapsible card titled Available helpers that sits at form level below both the Request and Response cards, so it reads as applying to the whole mapping rather than only the response body. It is collapsed by default, so it never pushes the rest of the form around — expand it when you need it.

The same panel appears in the same place on the messaging Add and Edit mapping forms (JMS, IBM MQ and file messages): a collapsible Available helpers card at form level, below the request and response. Open a messaging Add/Edit page and expand it — it behaves exactly as it does for HTTP.

The HTTP stub editor with the Request and Response cards side by side and the collapsed Available helpers panel at form level below both cards

Expand the panel and you will see a Filter helpers box, then a Response templating helpers section that lists the catalogue. The panel is a sectioned shell: future Traffic Parrot releases add further sections to it, and the filter narrows every section at once.

The expanded Available helpers panel showing the Response templating helpers section header above the catalogue, with helpers grouped by category and a copy-ready snippet and docs link for each

The panel lists the helpers grouped by category — for example Traffic Parrot data ({{dataSource}}, {{databaseQuery}}, {{objectStore}}, {{parseCsv}}), State & control ({{select}}, {{manageState}}, {{assign}}), Transform & compute ({{cast}}, {{math}}), Date & time ({{now}}, {{dateOffset}}), Random ({{randomValue}}), Extract ({{jsonPath}}, {{xPath}}) and Financial messaging ({{swiftField}}, {{fixField}}). Each entry shows a one-line description, a copy-ready snippet that is already scaffolded with example parameters, and a docs link to the relevant section of this page.

To work with the panel:

  • Type in the Filter helpers box to narrow the list as you go. The filter matches both the helper name and its description, and is case-insensitive.
  • Click the Copy link next to a helper to copy its snippet to the clipboard. The link briefly changes to Copied to confirm. Paste the snippet into the response body and adjust the example parameters to suit your mapping.

The response-body editor also offers the same helpers as inline autocomplete. Type {{ in the response body and a dropdown of matching helpers appears, filtered by whatever you type after the {{; select one to insert its scaffolded snippet at the cursor. Use the panel to browse and copy helpers, or type {{ to insert one inline without leaving the editor — both draw on the same catalogue.

The same {{ autocomplete is available in the messaging (JMS, IBM MQ and file-message) response-body editor, where it behaves exactly as it does for HTTP. On an IBM MQ mapping with several responses, each response body has its own autocomplete — including any responses you add with Add response message.

Typing {{ in the response body opens an autocomplete of templating helpers such as dataSource, databaseQuery, objectStore and parseCsv, each with a one-line description

The panel is read-only — it helps you discover and copy helpers, and does not change how mappings are saved or how responses are rendered.

Tutorial: Dynamic responses

For a basic introduction to dynamic responses with examples have a look at Dynamic responses tutorial.

Load CSV data file

Look up by row and column

Save your data in trafficparrot-x.y.z/data/data.csv in CSV format.

To load the data in the response use {{csvDataFile 'row,col'}} in the response definition.

For example, {{csvDataFile '2,4'}} will read file trafficparrot-x.y.z/data/data.csv then load the 2nd row in the file and then lookup the 4th column value.

Select data using condition

For more advanced CSV data loading, you can put your CSV file with any name in the trafficparrot-x.y.z/data directory.

To select data from a CSV use {{select 'a from x.csv where b equals' value}} in the response definition.

For example, {{select 'title from jobs.csv where name equals' 'example' }} will read the file trafficparrot-x.y.z/data/jobs.csv then load the value of the column title where the value of the column name is equal to the value example.

The value parameter passed to the {{select}} can be a dynamic value that is taken from the request e.g. xPath or jsonPath. For example:

{{select 'Age from UserData.csv where Username equals' (xPath request.body '//User/Username/text()')}}

You can enable the "select" helper CSV file indexing and caching for performance improvement by setting the property:

trafficparrot.virtualservice.handlebars.select.indexAndCacheCsvFiles=true

Computed values with arithmetic operations

After loading a value from a CSV file, you can include it in an arithmetic operation to compute a value. For example:

{
{{#with (jsonPath request.body '$.id') as |id|}}
"id": {{ id }},
"total": {{ math (select 'quantity from sales.csv where id equals' id) '*' (select 'price from sales.csv where id equals' id) }}
{{/with}}
}

Parse CSV string

Use {{parseCsv}} to parse a CSV string into rows that you can iterate over. This is useful when the CSV data is part of the request body or a variable rather than a file on disk.

The first row of the CSV is treated as the header row and the column names become the keys for each row.

Basic usage

Given a variable csv containing:

name,age
Alice,30
Bob,25

You can iterate over the rows:

{{#each (parseCsv csv)}}Name: {{this.name}}, Age: {{this.age}}
{{/each}}

You can count the number of rows using the size helper:

Total rows: {{size (parseCsv csv)}}

Custom delimiter

Use the delimiter parameter for non-comma-separated data:

{{#each (parseCsv csv delimiter=';')}}{{this.name}}{{/each}}

Custom quote character

Use the quote parameter to change the quote character:

{{#each (parseCsv csv quote="'")}}{{this.name}}{{/each}}

Generate random values

To generate a random value in the response use one of the following:

  1. {{randomInteger}} - A random integer, e.g. 1543243211
  2. {{randomInteger min max}} - A random integer between the given min and max, e.g. 10
  3. {{randomDouble}} - A random double, e.g. -0.3476573
  4. {{randomString}} - A random String, e.g. lW7H2gRfFqALsev0zDoJ4o3qGMtNYYgs
  5. {{randomUUID}} - A random UUID, e.g. 5d0d4989-b5c1-412e-bbe6-457fd5d58493

Generate placeholder images

The {{image}} Handlebars helper renders a placeholder PNG — a grey rectangle with the dimensions text drawn in the centre — and returns it as a Base64-encoded string. Combine it with the base64-decode-body response transformer to serve the rendered Base64 string as raw PNG bytes.

This is useful for stubbing endpoints that return images (avatars, thumbnails, product photos) without bundling real binary assets with your mappings. The helper uses only the JDK (BufferedImage, Graphics2D, ImageIO) — no extra dependencies, no network calls — so it works in air-gapped environments.

Arguments:

Argument Default Description
width 400 Image width in pixels.
height 300 Image height in pixels.
text "{width}x{height}" Overlay text drawn in the centre of the image. Defaults to the rendered dimensions (e.g. 400x300). Rendered with the JDK logical font Font.SANS_SERIF.

Example mapping:

{
  "request": { "method": "GET", "url": "/avatar" },
  "response": {
    "status": 200,
    "headers": { "Content-Type": "image/png" },
    "body": "{{image width=400 height=300}}",
    "transformers": ["base64-decode-body"]
  }
}

A GET /avatar against this mapping returns a 400×300 PNG with Content-Type: image/png. The Content-Type header is set in the mapping's headers field — the helper itself does not set any response headers.

Determinism

Within a single JVM, two requests with the same arguments produce byte-identical PNG output. This supports record/replay workflows that compare response bytes.

Cross-OS and cross-JDK byte equivalence is not guaranteed — the logical SANS_SERIF font maps to different physical fonts depending on the host operating system and installed font set. After a JDK upgrade or OS change, re-record any reference bytes you assert against.

Available to template

HTTP*

The following HTTP response regions can be templated:

  1. Response body
  2. Response header values
  3. Response proxy URL
  4. Response webhook URL
  5. Response webhook HTTP method
  6. Response webhook body
  7. Response webhook header values
  8. Response webhook enabled expression

JMS

The following JMS response regions can be templated:

  1. Response body

Native IBM® MQ

The following Native IBM® MQ response regions can be templated:

  1. Response body
  2. Response headers (replyToQueueManagerName, replyToQueueName)

Files

The following file response regions can be templated:

  1. Response file content
  2. Response file name

gRPC

The following gRPC response regions can be templated:

  1. Response body
  2. Response headers

Thrift

The following Thrift response regions can be templated:

  1. Response body

Use request data in response

HTTP

To use HTTP request attributes in the response:

  1. {{request.url}} - URL
  2. {{request.path}} - Path
  3. {{request.path.[n]}} - N-th path element
  4. {{request.query.parameterName}} - Parameter value
  5. {{request.query.parameterName.[n]}} - N-th parameter value
  6. {{request.headers.headerName}} - First value of a header
  7. {{request.headers.[headerName]}} - First value of a header
  8. {{request.headers.headerName.[n]}}- N-th value of header
  9. {{request.cookies.cookieName}} - Cookie value
  10. {{request.method}} - Request method e.g. GET
  11. {{request.body}} - Request body
  12. ...and more WireMock request attributes

To use HTTP request/response attributes in webhooks:

  1. {{originalRequest}} - Original request object, can be used as per {{request}} above
  2. {{originalResponse.body}} - Original response object (body only)

JMS

To use JMS request message attributes in the JMS response message:

  1. {{request.body}} - JMS request message body

Native IBM® MQ

To use Native IBM® MQ request message attributes in the IBM® MQ response message:

  1. {{request.body}} - IBM® MQ request message body
  2. {{request.header.replyToQueueManagerName}} - Reply-to queue manager name from the request message
  3. {{request.header.replyToQueueName}} - Reply-to queue name from the request message

Files

To use request file attributes in the response file:

  1. {{request.body}} - Request message body
  2. {{request.fileName}} - Request file name

gRPC

To use gRPC request attributes in the response:

  1. {{request.body}} - Request body as a JSON object

Thrift

To use Thrift request attributes in the response:

  1. {{request.body}} - Request body as a JSON object

Handlebars helpers

All of the default functionality provided by the jknack Java Handlebars implementation is available. You can find more information on the Handlebars.java blog or Handlebars.js guide.

We have support for:
  1. The default string helpers
  2. The default conditional helpers
  3. The default number helpers
  4. Separate template files using partials including template reuse and inheritance

Template files

You can place .hbs files in the installation root directory and reference them in your primary response template.

This can be useful to either reuse the same template many times, or to organize response template in separate files, with proper .hbs syntax highlighting in your editor or IDE.

The syntax

{{>responses/example-response}}

will load the content from the plain text template file responses/example-response.hbs.

The syntax

{{>(stringFormat 'responses/example-response-%s' 'some-value' )}}

allows you to construct the name of the template file dynamically using a string format for the name of the template file.

You can also pass in parameters to templates:

{{>responses/example-response parameter=1234 }}

or reference parameters that exist already in the surrounding context.

The default file extension is .hbs, you can use a different file extension as follows:

{{>example.txt}}

More advanced usage is possible with template inheritance which you can use to parameterize blocks in a template:

base.hbs
Something before
{{#block "content"}}
Some default content
{{/block}}
Something after
override.hbs:
{{#partial "content" }}
Some override content
{{/partial}}
{{> base}}

WireMock helpers

The following WireMock Handlebars helpers are available for use.

  1. {{xPath request.body '/a/b/text()'}} - Extract XML values or sub documents via XPath
  2. {{soapXPath request.body '/a/b/text()'}} - Extract SOAP XML values or sub documents via XPath
  3. {{jsonPath request.body '$.outer.inner'}} - Extract JSON values or sub documents via JSONPath
  4. {{randomValue length=32 type='ALPHANUMERIC' uppercase=true }} - Generate random strings (also supports mixedcase=true)
  5. {{pickRandom 'A' 'B' 'C'}} - Pick a random value from a list of alternatives
  6. {{randomInt lower=1 upper=10}} - Pick a random value in an integer range (lower inclusive, upper exclusive)
  7. {{randomDecimal lower=1.0 upper=1.5}} - Pick a random value in a decimal range (lower inclusive, upper exclusive)
  8. {{range -2 2}} - Generate a list of integers
  9. {{array 1 'string' true}} - Put given values in a list literal
  10. {{hostname}} - Print the local machine hostname
  11. {{date (parseDate request.headers.SomeDate format='dd-MM-yyyy')}} - Date parsing
  12. {{date (truncateDate (parseDate request.headers.SomeDate) 'first day of month')}} - Date truncation
  13. {{#trim}} text with whitespace {{/trim}} - Remove whitespace
  14. {{#base64 padding=false decode=false}}content{{/base64}} - Base64 encoding and decoding
  15. {{#urlEncode decode=false}}content{{/urlEncode}} - URL encoding and decoding
  16. {{formData request.body 'form' urlDecode=true}}{{form.formField3}} - HTTP form parsing
  17. {{regexExtract request.body '([a-z]+)-([A-Z]+)-([0-9]+)' 'parts'}}{{parts.0}},{{parts.1}},{{parts.2}} - Regular expression extraction
  18. {{#if (matches '1234' '[0-9]+')}}OK{{/if}} - Regular expression conditional
  19. {{#if (contains 'abcde123' 'bcd')}}OK{{/if}} - String or array contains conditional
  20. {{parseJson request.body 'bodyJson'}}{{bodyJson.name}} - Parse string into a named JSON object
  21. {{size request.query.things}} - Number of elements in a string/list/map
  22. {{systemValue type='ENVIRONMENT' key='wiremock_VARIABLE'}} - Use an environment variable or system property in a response. Only keys named wiremock* are permitted, and environment-variable names use an underscore (wiremock_VARIABLE) rather than a dot — see the dedicated how-to page for the type='PROPERTY' variant, the default= fallback, header usage, and the allow-list rules.
  23. {{#assign 'name'}}value{{/assign}} - Set a string variable with assign block
  24. {{val 1234 assign='numberVar'}} - Set a variable of any type with val (preserves type, unlike assign which always stores strings)
  25. {{val request.query.example or='default'}} - Get a variable with a default value
  26. {{lookup object 'field'}} - Object field lookup
  27. {{arrayAdd (array 'example1' 'example2') 'example-middle' position=1}} - Array element add
  28. {{arrayRemove (array 'example1' 'middle' 'example2') position=1}} - Array element remove
  29. {{arrayJoin ',' (array '1' '2' '3')}} - Array join with separator
  30. {{formatJson jsonObject}} - Format JSON in pretty or compact form (supports format='compact')
  31. {{formatXml xmlString}} - Format XML in pretty or compact form (supports format='compact')
  32. {{toJson someObject}} - Convert any object to a JSON string
  33. {{jsonMerge json1 json2}} - Merge two JSON objects recursively (supports removeNulls=true)
  34. {{jsonRemove jsonString jsonPath='$.field'}} - Remove elements from JSON by JSON path
  35. {{jsonArrayAdd existingJson jsonPath='$.items' newItem}} - Add items to a nested JSON array

The following WireMock Handlebars helpers have alternatives in Traffic Parrot.

  1. {{math}} - See Arithmetic operations
  2. {{now}} - See Transform strings and Date offset
    • The default implementation of {{now}} can be toggled using trafficparrot.properties
      • To use the Handlebars.java {{now}} helper:
        trafficparrot.virtualservice.handlebars.now.provider=HANDLEBARS
      • To use the WireMock {{now}} helper:
        trafficparrot.virtualservice.handlebars.now.provider=WIREMOCK
    • Alternatively, you can add the provider parameter per call to dynamically switch between them, otherwise the default implementation specified in trafficparrot.properties will be used
      • To enable this set in trafficparrot.properties:
        trafficparrot.virtualservice.handlebars.now.dynamic=true
      • To use the Handlebars.java implementation:
        {{now format='short' provider='HANDLEBARS'}}
      • To use the WireMock implementation:
        {{now offset='2 years' format='epoch' provider='WIREMOCK'}}

WireMock JWT helpers

The JWT Extension for WireMock is supported.

JWT usage examples, typically mocked via an /oauth/token endpoint:

{{jwt maxAge='12 days'}}
{{jwt exp=(parseDate '2041-02-23T21:22:23Z')}}
{{jwt nbf=(parseDate '2019-02-23T21:22:23Z')}}
{{jwt iss='https://issuer.trafficparrot.com/'}}
{{jwt aud='https://audience.trafficparrot.com/'}}
{{jwt sub='subject'}}
{{jwt alg='RS256'}}
{{jwt
    customBoolClaim=true
    customIntClaim=23
    customStringClaim='example@x.y.z'
    customDateClaim=(parseDate '2024-01-02T03:04:05Z')
}}

JSON Web Key Set (JWKS) usage example, typically mocked via an /.well-known/jwks.json endpoint:

{{jwks}}

Settings also visible via http://localhost:8080/api/http/__admin/settings as:

{
  "settings" : {
    "extended" : {
      "jwt" : {
        "hs256Secret" : "...",
        "rs256PublicKeyId" : "...",
        "rs256PublicKey" : "-----BEGIN RSA PUBLIC KEY-----\n...\n-----END RSA PUBLIC KEY-----\n",
        "rs256PrivateKey" : "-----BEGIN RSA PRIVATE KEY-----\n...\n-----END RSA PRIVATE KEY-----\n"
      }
    }
  }
}

Enable in trafficparrot.properties by setting:

trafficparrot.http.jwt.enabled=true

Transform strings

All of jknack Handlebars string helpers are available for use in both HTTP and JMS response headers and body.

  1. {{defaultIfEmpty value ["default value"]}} - Render a default value if the specified value is not available, for example {{defaultIfEmpty request.query.username "Username parameter was not present in the request"}}
  2. {{substring value start end}} - Render the beginning of the string value, for example {{defaultIfEmpty request.query.username 0 3}}
  3. {{substring value start}} - Render the end of the string value, for example {{defaultIfEmpty request.query.username 5}}
  4. {{replace value "aaa" "bbb"}} - Replace string aaa with bbb
  5. {{abbreviate value 5}} - Render a truncated version of a string. Minimum value is 4.
  6. {{yesno value [yes="yes"] [no="no"] maybe=["maybe"]}} - Convert a boolean "true", "false" to a string representation
  7. {{capitalize value [fully=false]}} - Capitalize a string
  8. {{stripTags value}} - Remove all HTML or XML tags from the string
  9. {{stringFormat string param0 param1 ... paramN}} - Format the string
  10. {{slugify value}} - Create a slug, for example "a b c" will be rendered as "a-b-c"
  11. {{numberFormat number ["format"] [locale=default]}} - Format a number for a given locale or format
  12. {{now ["format"] [tz=timeZone|timeZoneId]}} - Date is a specified format and timezone
  13. {{upper value}} - Uppercase string
  14. {{lower value}} - Lowercase string
  15. {{rjust value 20 [pad=" "]}} - Right adjust string
  16. {{ljust value 20 [pad=" "]}} - Left adjust string
  17. {{cut value [" "]}} - Cut out all the occurrences in the string
  18. {{center value size=19 [pad="char"]}} - Center string value padded with the specified character
  19. {{capitalizeFirst value}} - Capitalize first word
  20. {{join value "," [prefix="aPrefix"] [suffix="aSuffix"]}} - Join an array of values

Arithmetic operations

The math helper can be used to perform arithmetic operations:

  1. {{math a "+" b}} - Addition
  2. {{math a "-" b}} - Subtraction
  3. {{math a "*" b}} - Multiplication
  4. {{math a "/" b}} - Division
  5. {{math a "%" b}} - Modulus
  6. {{math "-" x}} - Negate
  7. {{math "round" x}} - Round
Supported options:
  • scale=N - the result will have N digits to the right of the decimal point

Modify response

The {{ modifyResponse }} helper can be used to modify the:

  • response HTTP status code
  • response header values
Examples:
  1. Modify the response status code:
    {{ modifyResponse 'statusCode' 404 }}
  2. Modify the response status code conditionally:
    {{#contains request.body 'A'}}
        {{ modifyResponse 'statusCode' 400 }}
    {{else contains request.body 'B'}}
        {{ modifyResponse 'statusCode' 500 }}
    {{else}}
        {{ modifyResponse 'statusCode' 200 }}
    {{/contains}}
  3. Modify a header value:
    {{ modifyResponse 'headerValue' 'header-name' 'header-value' }}

Convert data type

The {{ cast }} helper can be used to convert between data types.

Examples:
  1. {{ cast value type='int' }} - convert value to an int
  2. {{ cast list type='string' }} - convert list of elements to list of strings
  3. {{ cast list type='string' single=true }} - extract only element from a list and convert to a string type
  4. {{ randomInteger 0 (cast (xPath request.body '/Node/Max/text()') type='int') }} - example nested usage
  5. {{#if (cast value type='boolean') }}value cast to true{{/if}} - example if conditional usage
  6. {{#if (not (cast value type='boolean') ) }}value cast to false{{/if}} - example if not conditional usage
  7. {{#unless (cast value type='boolean') }}value cast to false{{/unless}} - example unless conditional usage
Supported options:
  • single=true - extract only element from a single element list
  • type='string' - convert to string representation
  • type='long' - convert to long
  • type='int' - convert to int
  • type='short' - convert to short
  • type='double' - convert to float
  • type='float' - convert to double
  • type='boolean' - convert to boolean
When casting to boolean, the semantics are:
  • The string 'true' casts to boolean true
  • The string 'false' casts to boolean false
  • Blank strings like '' or ' ' cast to boolean false
  • Empty collections cast to boolean false
  • Non-empty collections cast to boolean true
  • The number zero casts to boolean false
  • Non-zero numbers cast to boolean true

Date offset

The {{ dateOffset }} helper can be used to calculate an offset from a given date. This can be combined with extracting data from the request to dynamically offset a date in the response based on a date in the request.

Examples:
  • {{ dateOffset "2018-07-09" add=true format="yyyy-MM-dd" days=1 }} - add 1 day to the given date
  • {{ dateOffset "2017-10-31T16:16:10" inFormat="yyyy-MM-dd'T'HH:mm:ss" outFormat="yyyy-MM-dd'T'HH:mm:ssZ" zone="America/Los_Angeles" days=1 hours=4 }} - subtract 1 day and 4 hours from given local date and reformat as a timestamp in time zone
Supported options:
  • add=true - add to the input date rather than the default of subtracting
  • format="yyyy-MM-dd" - specify a date format for both parsing and formatting using standard date and time formatting options
  • inFormat="yyyy-MM-dd" - specify a date format for parsing using standard date and time formatting options
  • outFormat="yyyy-MM-dd" - specify a date format for formatting using standard date and time formatting options
  • zone="UTC" - specify a time zone ID for both parsing and formatting e.g. America/Los_Angeles or UTC or -08:30
  • inZone="UTC" - specify a time zone ID for parsing e.g. America/Los_Angeles or UTC or -08:30
  • outZone="UTC" - specify a time zone ID for formatting e.g. America/Los_Angeles or UTC or -08:30
  • days=1 - number of days to offset by
  • minutes=1 - number of minutes to offset by
  • seconds=1 - number of seconds to offset by
  • millis=1 - number of milliseconds to offset by
  • nanos=1 - number of nanoseconds to offset by

Data source

The {{ dataSource }} helper can be used to query or update an existing data source using a SQL style syntax. This can be combined with extracting data from the request to dynamically select a response field or update state for later use.

Currently supported data source features:
Source CREATE SELECT INSERT UPDATE DELETE Caching Batch Update Multiple Results Multiple Conditions Default Values
CSV
XLS
JDBC
Couchbase1

1 Couchbase uses N1SQL aka SQL++ statements which also includes other operations such as UPSERT and MERGE

Please contact us if you require any data source operation compatibility that is not currently available.

Examples:
  1. Select a single value from data/isoCountryCodes.csv or default to GBR:
    {{ dataSource '.csv'
    'SELECT isoCountryCode
    FROM isoCountryCodes.csv
    WHERE internalCode = :1'
    (jsonPath request.body '$.internalCode')
    single=true
    default='GBR' }}
  2. Select multiple rows and columns from the JDBC database with id example.db:
    [
    {{#each (dataSource 'example.db' 'SELECT * FROM table') }}
        {
            "A": {{ A }},
            "B": {{ B }}
        }{{#unless @last}},{{/unless}}
    {{/each}}
    ]
  3. Insert single record into the JDBC database with id example.db:
    {{ dataSource 'example.db'
    'INSERT INTO PERSON(ID, NAME) VALUES(:id, :name)'
    id=(jsonPath request '$.id')
    name=(jsonPath request '$.name') }}
  4. Insert multiple records into the JDBC database with id example.db:
    {{ dataSource 'example.db'
    'INSERT INTO PERSON(ID, NAME) VALUES(:ids, :names)'
    ids=(jsonPath request '$.data[*].id')
    names=(jsonPath request '$.data[*].name') }}
  5. Select multiple columns and single row from XLS file data/example.xlsx and sheet ExampeSheet:
    {{#with (dataSource 'example.xlsx' 'SELECT * FROM ExampleSheet' singleRow=true ) }}
    {
        "A": {{ A }},
        "B": {{ B }}
    }
    {{/with}}
  6. Select single value using positional argument :1
    {{dataSource 'example.xlsx'
    'SELECT name
    FROM ExampleSheet
    WHERE id = :1'
    (jsonPath request.body '$.id')
    single=true }}
  7. Select single value using named argument :id
    {{dataSource 'example.xlsx'
    'SELECT name
    FROM ExampleSheet
    WHERE id = :id'
    id=(jsonPath request.body '$.id')
    single=true }}
Supported options:
  • single=true - extract single row single column result
  • singleRow=true - extract single row result
  • maxRows=N - limit number of rows returned
  • default=value - provide default value to be used on error or no result
  • shared=true - use configuration from installation root when true or configuration from scenarios/ScenarioName/* when false

Further details on the specifics of each data source can be found below.

CSV
  • The .csv files should be placed in the data directory
  • To configure caching of CSV files for improved performance use the propertytrafficparrot.virtualservice.handlebars.select.indexAndCacheCsvFiles=true
  • Column names must be defined in the first row
XLS
  • The .xls or .xlsx files should be placed in the data directory
  • Sheet names are used as the "table" to select from
  • Column names must be defined in the first row
JDBC
  • Supported databases include:
    • MySQL
    • MariaDB
    • PostgreSQL
    • Oracle
    • Microsoft SQL Server MSSQL
    • and any other database that has a JDBC driver
  • The database driver JAR must be placed in the lib/external/*.jar directory
  • The database schema and tables must already exist before attempting to use as a data source
  • The database connection should be defined in the database-connections.json file, for example:
    [
      {
        "connectionId": "example.db",
        "type": "JDBC_CONNECTION",
        "driverClass": "org.h2.Driver",
        "jdbcUrl": "jdbc:h2:mem:example",
        "properties": {
          "user": "sa",
          "password": "sa"
        }
      },
      {
        "connectionId": "postgres.db",
        "type": "JDBC_CONNECTION",
        "driverClass": "org.postgresql.Driver",
        "jdbcUrl": "jdbc:postgresql://host:port/database",
        "properties": {
          "user": "user",
          "password": "password"
        }
      }
    ]
Couchbase
  • The following Couchbase SDK JARs must be placed in the lib/external/*.jar directory:
  • The bucket must already exist before attempting to use as a data source
  • The database connection should be defined in the database-connections.json file, for example:
    [
      {
        "connectionId": "couchbase.db",
        "type": "COUCHBASE_CONNECTION",
        "connectionString": "couchbase://localhost:32784",
        "username": "Administrator",
        "password": "password",
        "warmupQuery": "SELECT COUNT(*) FROM bucket_a UNION SELECT COUNT(*) FROM bucket_b",
        "enableDnsSrv": true,
        "networkResolution": "auto"
      }
    ]
  • Couchbase uses N1SQL aka SQL++ statements in the following syntax:
    {{ dataSource 'couchbase.db' 'INSERT INTO PERSON(KEY, VALUE) VALUES ("$id", {"id" : $id,"name" : $name})' id=1000 name='some-name' syntax='N1QL' }}
    {{ dataSource 'couchbase.db' 'SELECT name FROM PERSON USE KEYS "$id"' id=1000 single=true syntax='N1QL' }}
    {{ dataSource 'couchbase.db' 'INSERT INTO PERSON(KEY, VALUE) VALUES ("$id", $object)' id=1000 object=example syntax='N1QL' }}
  • You can control query scan consistency using the scanConsistency parameter:
    • scanConsistency='REQUEST_PLUS' - consistent results, waits for all pending mutations to be indexed (default)
    • scanConsistency='NOT_BOUNDED' - faster queries, results may not include the most recent mutations
    For example:
    {{ dataSource 'couchbase.db' 'SELECT name FROM PERSON USE KEYS "$id"' id=1000 single=true syntax='N1QL' scanConsistency='NOT_BOUNDED' }}
  • Couchbase queries that fail due to a missing document return an empty result, which can be handled using default='' for clean conditional logic. Other Couchbase errors (e.g. syntax errors or connection issues) return an error message instead of throwing an exception. You can use the default option to provide a fallback value.

Object store

The {{ objectStore }} helper can be used to query or update a JSON object. This can be combined with extracting data from the request to manage simple persistent object state across requests.

Examples:
  1. Create a new object in data/person-uuid.json using the incoming JSON request body and unique id:
    {{ objectStore 'person.json' operation='create' id=(jsonPath request.body '$.id') object=request.body }}
  2. Create a new object in data/person-uuid.json using the incoming JSON request body and generated unique id:
    {{#trim}}
    {{#with (randomValue type='UUID') }}
    {{ objectStore 'person.json' operation='create' id=. object=request.body }}
    {{ objectStore 'person.json' operation='put' id=. path='$' key='id' object=. }}
    {{ objectStore 'person.json' operation='get' id=. path='$' }}
    {{/with}}
    {{/trim}}
  3. Get an existing object stored in data/person-uuid.json:
    {{ objectStore 'person.json' operation='get' id=(jsonPath request.body '$.id') path='$' }}
  4. Get a particular field from an existing object stored in data/person-1.json:
    {{ objectStore 'person.json' operation='get' id=(jsonPath request.body '$.id') path='$.field' }}
  5. Set an existing field to the value of a field in the request:
    {{ objectStore 'person.json' operation='set' id=(jsonPath request.body '$.id') path='$.field' object=(jsonPath request.body '$.field') }}
  6. Delete an existing field:
    {{ objectStore 'person.json' operation='delete' id=(jsonPath request.body '$.id') path='$.field' }}
  7. Delete entire object:
    {{ objectStore 'person.json' operation='delete' id=(jsonPath request.body '$.id') path='$' }}
  8. Add or update a field at the root of the object:
    {{ objectStore 'person.json' operation='put' id=(jsonPath request.body '$.id') path='$' key='field' object=(jsonPath request.body '$.field') }}
  9. Add or update a field at a child of the object:
    {{ objectStore 'person.json' operation='put' id=(jsonPath request.body '$.id') path='$.child' key='field' object=(jsonPath request.body '$.child.field') }}
  10. Add an element to an existing array:
    {{ objectStore 'person.json' operation='add' id=(jsonPath request.body '$.id') path='$.names' object=(jsonPath request.body '$.name') }}
Supported options:
  • operation='name' - supported operations are: create, get, set, delete, add, put
  • overwrite=true - allows the create operation to overwrite an existing object when true
  • id='' - a unique id must be provided to identify the object
  • default=null - if specified, the provided default value will be returned if an object is not found with the given id
  • path='$' - a JSONPath expression used by the operation
  • object='' - a JSON object used by the operation
  • key='' - the name of the new field to be added by the put operation
  • shared=true - use configuration from installation root when true or configuration from scenarios/ScenarioName/* when false

Manage state

The {{ manageState }} helper can be used to manage simple key-value state across requests. You can set a value in one response and retrieve it in a subsequent response, enabling stateful mock behaviour.

State can be organized into namespaces using the namespace/variableName syntax. If no namespace is specified, the variable is stored in the global namespace. This matches the namespace convention used by the state management REST API.

Operations:

  1. Set a global variable:
    {{ manageState 'counter' 'set' 1234 }}
  2. Get a global variable:
    {{ manageState 'counter' 'get' }}
  3. Increment a global variable by a numeric value:
    {{ manageState 'counter' '+' 1 }}
  4. Set a variable in a specific namespace:
    {{ manageState 'scenario-1/counter' 'set' 42 }}
  5. Get a variable from a specific namespace:
    {{ manageState 'scenario-1/counter' 'get' }}
  6. Increment a variable in a specific namespace:
    {{ manageState 'scenario-1/counter' '+' 1 }}
  7. Use a custom separator (default is /):
    {{ manageState 'scenario-1::counter' 'get' separator='::' }}

Variables in different namespaces are isolated from each other. For example, scenario-1/counter and scenario-2/counter are independent variables. Variables without a namespace prefix (e.g. counter) use the global namespace and can be accessed via the REST API at GET /api/state/global/counter.

Namespaced variables can be accessed via the REST API at GET /api/state/{namespace}/{name}, for example GET /api/state/scenario-1/counter. You can also reset all state using DELETE /api/state or clear a single namespace using DELETE /api/state/{namespace}.

Evaluate

The {{ evaluate }} helper can be used to evaluate an expression in a scripting language such as JavaScript.

NOTE: this requires a scripting engine such as Nashhorn or GraalVM to be installed, either as part of the JRE or placed in the lib/external/*.jar directory.

Examples:
  1. Complex boolean expression:
    {{ evaluate '/[0-9]+/.test(request.headers["request-id"]) && JSON.parse(request.body)["name"].contains("123123")' }}
  2. Using if statements:
    {{#evaluate}}
    if (key === 123) {
      'hello world 123'
    } else {
      'hello non 123 world'
    }
    {{/evaluate}}
  3. Render current epoch time:
    {{ evaluate 'new Date().getTime()' }}
  4. Render using print statement:
    {{ evaluate 'print("hello world print")'}}
Supported options:
  • language='js' - currently only js is supported, which is also the default
  • redirectOutput='RESULT' - RESULT will enable print statements LOGS will suppress print statements from the result and instead put them in the Traffic Parrot logs
Supported context items:
  • Use the keyword self to reference the current context object:
    {{#with 'test' }}{{ evaluate 'self' }}{{/with}}
  • Use the name of any context variable to reference it:
    {{ evaluate 'name' }}
  • Use the syntax parameters[i] to reference parameters by index:
    {{ evaluate 'parameters[2]' 'zero' 'one' 'two' }}
  • Use the syntax options["name"] to reference named options by name:
    {{ evaluate 'options["example"]' example='value' }}

Extract data from request fields and attributes

The following additional helpers are available in HTTP, JMS, IBM MQ and File response templates.

xPath

You can use it to extract a value from a field using an XPath.

Syntax:
{{xPath sourceAttribute 'TheXPathValue'}}
For example, if you use the following handlebar in a HTTP response body:
Request foobar value was: {{xPath request.body '/foo/bar/text()'}}
and then send a HTTP request:
<foo><bar>Long live mocking!</bar></foo>
you will see a HTTP response:
Request foobar value was: Long live mocking!
xPathList

You can use it to extract a list of nodes from a field using an XPath. Can be combined with loop iterators to transform a request body.

Syntax:
{{xPathList sourceAttribute 'TheXPathValue'}}
For example, if you use the following handlebar in a HTTP response body:
<items>
  {{#each (xPathList request.body '/request/items') }}
    <item id="{{ xPath this '/item/@id' }}" status="OK">{{ xPath this '/item/text()' }}</item>
  {{/each}}
</items>
and send a HTTP request:
<request>
    <items>
        <item id="one" ignored="any">body1</item>
        <item id="two" ignored="any">body2</item>
    </items>
</request>
you will see a HTTP response:
<items>
    <item id="one" status="OK">body1</item>
    <item id="two" status="OK">body2</item>
</items>
jsonPath

You can use it to extract a value from a field using an JsonPath.

Syntax:
{{jsonPath sourceAttribute 'TheJsonPathValue'}}
For example, if you use the following handlebar in a HTTP response body:
Request foobar value was: {{jsonPath request.body '$.foo.bar'}}
and then send a HTTP request:
{"foo":{"bar":"Long live mocking!"}}
you will see a HTTP response:
Request foobar value was: Long live mocking!
You can also use JsonPath conditional expressions, for example to check for the presence of a field:
{{#if (jsonPath request.body '$.[?(@.field)]') }}field is present{{/if}}
{{#if (not (jsonPath request.body '$.[?(@.field)]') ) }}field is not present{{/unless}}
{{#if (jsonPath request.body '$.[?(!(@.field))]') }}field is not present{{/unless}}
{{#unless (jsonPath request.body '$.[?(@.field)]') }}field is not present{{/unless}}
jsonPathList

You can use it to extract a list of values from a field using an JsonPath. Can be combined with loop iterators to transform a request body.

Syntax:
{{jsonPathList sourceAttribute 'TheJsonPathValue'}}
For example, if you use the following handlebar in a HTTP response body:
[
  {{#each (jsonPathList request.body '$.items') }}
    { id: {{ jsonPath this '$.id' }}", status: "OK" }{{#unless @last}},{{/unless}}
  {{/each}}
]
and send a HTTP request:
{
    items: [
        { id: 1234, ignored: "any" },
        { id: 1235, ignored: "any" }
    ]
}
you will see a HTTP response:
[
    { id: 1234, status: "OK" },
    { id: 1235, status: "OK" }
]
regex

You can use it to extract a value from a field using a single regular expression capturing group.

Syntax:
{{regex sourceAttribute 'TheRegex(.*)Value'}}
For example, if you use the following handlebar in a HTTP response body:
Request value was: {{regex request.body '.+? ([0-9A-Za-z]+Camel-[0-9A-Za-z]+).*'}}
and then send a HTTP request:
before 001116059c5549a0tOACamel-116059c554a20tOH after
you will see a HTTP response:
Request value was: 001116059c5549a0tOACamel-116059c554a20tOH
swiftField

You can use it to extract a field value from a SWIFT MT message by its tag number. This is useful when creating dynamic responses that reference specific fields from a SWIFT message request body.

Syntax:
{{swiftField sourceAttribute 'TagNumber'}}
For example, if you use the following handlebar in a response body:
Transaction reference: {{swiftField request.body '20'}}
and then send a request with a SWIFT MT103 message body:
{1:F01BANKBEBBAXXX0000000000}{2:I103BANKDEFFXXXXN}{4:
:20:TXNREF001
:23B:CRED
:32A:230101EUR1000,00
:50K:/1234567890
ACME CORP
:59:/9876543210
BENEFICIARY NAME
123 MAIN STREET
LONDON
:71A:SHA
-}
you will see a response:
Transaction reference: TXNREF001

The helper also works with bare Block 4 content (without the SWIFT envelope blocks). For example:

{{swiftField request.body '59'}}

applied to:

:20:REF001
:59:/9876543210
BENEFICIARY NAME
123 MAIN STREET
LONDON
:71A:SHA

returns the full multi-line value:

/9876543210
BENEFICIARY NAME
123 MAIN STREET
LONDON

If the specified tag is not present, or if the input is not a SWIFT message, the helper returns an empty string. If the tag appears multiple times, the first occurrence is returned.

fixField

You can use it to extract a field value from a FIX protocol message by its tag number. This is useful when creating dynamic responses that echo specific tags (such as ClOrdID) from a FIX request body.

Syntax:
{{fixField sourceAttribute 'TagNumber'}}
For example, if you use the following handlebar in a response body:
Order id was: {{fixField request.body '11'}}
and then send a request with a FIX NewOrderSingle body (SOH-delimited, shown here with | for readability):
8=FIX.4.4|9=176|35=D|49=SENDER|56=TARGET|11=ORDER-1|55=AAPL|54=1|10=000|
you will see a response:
Order id was: ORDER-1

Tag numbers are treated as opaque string keys, so the helper works across FIX 4.2, 4.4, 5.0, and FIXT without any FIX-dictionary validation. If the specified tag is not present, or if the input is not a FIX message, the helper returns an empty string. If the tag appears multiple times (for example inside a repeating group), the first occurrence is returned.

fixWithChecksum, fixBodyLength, fixCheckSum

Together these three helpers let you author a FIX 4.x response template without hand-calculating tag 9 (BodyLength) and tag 10 (CheckSum). {{#fixWithChecksum}}...{{/fixWithChecksum}} is a block helper that renders its inner template and then substitutes the two inline placeholders:

  • {{fixBodyLength}} — expands to the FIX 4.x BodyLength: the number of UTF-8 bytes between the SOH after 9= and the start of 10=.
  • {{fixCheckSum}} — expands to the FIX 4.x CheckSum: a 3-digit zero-padded modulo-256 sum of every byte before 10=.
Syntax (where {soh} denotes the literal SOH byte, ASCII 0x01, used as the FIX field delimiter):
{{#fixWithChecksum}}8=FIX.4.4{soh}9={{fixBodyLength}}{soh}35=8{soh}49=TARGET{soh}56=SENDER{soh}11=ORDER-1{soh}10={{fixCheckSum}}{soh}{{/fixWithChecksum}}

When the template above is used as a response body, Traffic Parrot computes both values from the rendered bytes and writes the standard FIX 4.x values into the message — for example, 9=54 and 10=128. The BodyLength is substituted first so the CheckSum is computed over the final message bytes (including the rendered BodyLength value), matching the FIX 4.x semantics where the checksum protects the entire wire message except the trailer.

{{fixBodyLength}} and {{fixCheckSum}} only work inside a {{#fixWithChecksum}} block. Used outside the block they render as the literal error string {{ fixBodyLength ERROR: can only be used inside a fixWithChecksum block }} (or the equivalent for fixCheckSum), matching the error format used by other Traffic Parrot helpers such as fixField.

The block composes with fixField so a response template can echo tags from the inbound request and still get correct BodyLength and CheckSum values. For example:

{{#fixWithChecksum}}8=FIX.4.4{soh}9={{fixBodyLength}}{soh}35=8{soh}49=TARGET{soh}56=SENDER{soh}11={{fixField request.body '11'}}{soh}10={{fixCheckSum}}{soh}{{/fixWithChecksum}}

The {{fixField request.body '11'}} call extracts the ClOrdID from the inbound request body; the block then computes the correct 9= and 10= values for the rendered response.

Nested handlebars helpers

You can call helpers inside other helpers. You just have to wrap them in parenthesis.

For example, if you use the following handlebar in a HTTP response body:
Bar was equal to xxx: {{#equal (jsonPath request.body '$.foo.bar') 'xxx'}}true{{else}}false{{/equal}}'
and then send a HTTP request:
{"foo":{"bar":"xxx"}}
you will see a HTTP response:
Bar was equal to xxx: true

Loops and iterators

All block helpers defined in the handlebars specification are available. As an example the following use of {{#each}} in a response body will render all request headers:
<requestHeaders>
  {{#each request.headers}}
    <name>{{@key}}</name>
    <value>{{this}}</value>
  {{/each}}
</requestHeaders>

Variables

The standard {{#with}}defined in the handlebars specification is available. As an example the following use of {{#with}} in a response body allows reuse of the same variable multiple times in the block:
{{#with (jsonPath request.body '$.internalCode') as |internalCode|}}
  "internalCode": {{ internalCode }},
  "isoCountryCode": "{{select 'isoCountryCode from isoCountryCodes.csv where internalCode equals' internalCode }}"
{{/with}}

Conditionals and logic

Standard Handlebars block helpers

All block helpers defined in handlebars specification are available. On top, all conditionals are also available. See below for example usage.
if else
As an example the following use of {{#if}} in a response body will render a different response based on availability of a request parameter:
{{#if request.query.password}}
  Password was present in the request.
{{else}}
  Please provide a password!
{{/if}}
eq
Check if two elements are equal. For example, we can render 'PASS' or 'FAIL'
{{#eq x y}}
  PASS
{{else}}
  FAIL
{{/eq}}
Render 'true' or 'false':
{{eq x y}}
Or, render 'y' or 'n':
{{eq x y yes='y' no='n'}}
neq
Check if two elements are not equal. For example, we can render 'PASS' or 'FAIL'
{{#neq x y}}
  PASS
{{else}}
  FAIL
{{/eq}}
Render 'true' or 'false':
{{neq x y}}
Or, render 'y' or 'n':
{{neq x y yes='y' no='n'}}
gt
Check if a value is greater then the other.
{{#gt x y}}
yes
{{else}}
no
{{/gt}}
Render 'true' or 'false':
{{gt x y}}
Render 'y' or 'n':
{{gt x y yes='y' no='n'}}
gte
Check if a value is greater or equal to the other.
{{#gte x y}}
yes
{{else}}
no
{{/gt}}
Render 'true' or 'false':
{{gte x y}}
Render 'y' or 'n':
{{gte x y yes='y' no='n'}}
lt
Check if a value is less than the other.
{{#lt x y}}
yes
{{else}}
no
{{/gt}}
Render 'true' or 'false':
{{lt x y}}
Render 'y' or 'n':
{{lt x y yes='y' no='n'}}
lte
Check if a value is less than or equal to the other.
{{#lte x y}}
yes
{{else}}
no
{{/gt}}
Render 'true' or 'false':
{{lte x y}}
Render 'y' or 'n':
{{lte x y yes='y' no='n'}}
and
Check if both values are true.
{{#and x y}}
 yes
{{else}}
 no
{{/and}}
Multiple arguments are supported:
{{#and x y z zz}}
 yes
{{else}}
 no
{{/and}}
Render 'true' or 'false':
{{and x y}}
Render 'y' or 'n':
{{and x y yes='y' no='n'}}
or
Check if at least one value is true.
{{#or x y}}
 yes
{{else}}
 no
{{/and}}
Multiple arguments are supported:
{{#or x y z zz}}
 yes
{{else}}
 no
{{/and}}
Render 'true' or 'false':
{{or x y}}
Render 'y' or 'n':
{{or x y yes='y' no='n'}}
not
Logic negation.

Render 'yes' or 'no':

{{#not x}}
 yes
{{else}}
 no
{{/not}}
Render 'true' or 'false':
{{not x}}
Render 'y' or 'n':
{{not x yes='y' no='n'}}

Additional block helpers

There are also additional helpers available:
equal

You can use it to compare two values.

Syntax:
{{#equal attributeValue1 attributeValue2}} result if true {{else}} result if false {{/equal}}
For example, if you use the following handlebar:
Is user Bob? {{#equal request.query.user 'Bob'}} Yes! {{else}} No! {{/equal}}
It can also be used inline to render true or false:
{{ equal a b }}
ifEven

You can use it to see if a number is even or odd.

Syntax:
{{#ifEven attributeValue}} result if true {{else}} result if false {{/equal}}
For example, use the following handlebar to see if the number of order items in the request body (which is json) is odd or even:
{{#ifEven (jsonPath request.body '$.orderItem')}}number is even{{else}}number is odd{{/ifEven}}
times

You can use it to repeat the contents of the block a fixed number of times. Inside the block, {{@index}} gives the current iteration (starting at 0) and {{@last}} is true on the final iteration.

Syntax:
{{#times number}} repeated content {{/times}}
For example, the following handlebar renders 0,1,2,3,4:
{{#times 5}}{{@index}}{{#unless @last}},{{/unless}}{{/times}}
The count can also come from the request, for example to repeat once per order item:
{{#times (jsonPath request.body '$.orderItemCount')}}item {{@index}}
{{/times}}

The count may be an integer or a numeric string; decimals are truncated and a count of zero or less renders nothing. If the count is missing you can supply a fallback with defaultTimes:

{{#times request.query.repeat defaultTimes=3}}{{@index}}{{/times}}

Assorted

  1. {{httpNow}} - Date in RFC 1123 format (HTTP date format), e.g. Date: {{httpNow}} can be rendered as Date: Sat, 01 Apr 2017 10:55:05 GMT. Typically used as a value for the "Date" header.
  2. {{size attributeName}} - Size or length of an array or collection, for example {{size (jsonPathList request.body '$.items')}}

Ask for new extensions

If you need new extensions just email us at support@trafficparrot.com we will will do our best to create them for you.

Disabling {{...}}

If you would like to use {{...}} notation in your templates and not having it interpreted as an attempt to use an extension you need to do one of the following things:
  1. For individual responses, use escaped syntax: \{{...}}
  2. Or, disable extensions globally by setting both trafficparrot.jms.handlebars.enabled=false and trafficparrot.http.handlebars.enabled=false in trafficparrot.properties and restarting Traffic Parrot

Error handling

By default, when a Handlebars helper encounters an error (for example, a database connection failure in {{dataSource ...}} or an invalid file path in {{csvDataFile ...}}), Traffic Parrot embeds an inline error string in the response body instead of failing the request. The error string looks like:

{{ helperName ERROR: error message here }}

This means the response is returned with an HTTP 200 status (or successful delivery for messaging protocols) even though the template did not render correctly. This can make errors difficult to detect in automated test pipelines.

Strict error mode

You can enable strict error handling by setting the following property in trafficparrot.properties and restarting Traffic Parrot:

trafficparrot.virtualservice.handlebars.throwErrors=true

When this property is set to true, helper errors cause the request to fail instead of embedding the error text in the response:

  • HTTP: The virtual service returns an HTTP 500 error
  • JMS, IBM MQ, File messaging: The message processing fails with an exception

This is useful for CI/CD pipelines and contract testing, where you want template errors to cause visible test failures rather than silently returning incorrect response bodies.

Default behavior is unchanged

The default value is false, which preserves the existing behavior of embedding error strings in responses. You only need to change this property if you want stricter error handling.

Built-in response transformers

Traffic Parrot includes several built-in response transformers that provide common functionality without requiring custom code.

Editing transformer parameters in the GUI

Some built-in transformers (for example HmacSigningTransformer) read their configuration from a transformerParameters object on the mapping's response. You can edit that object directly in the Edit Mapping form: open the mapping, expand 
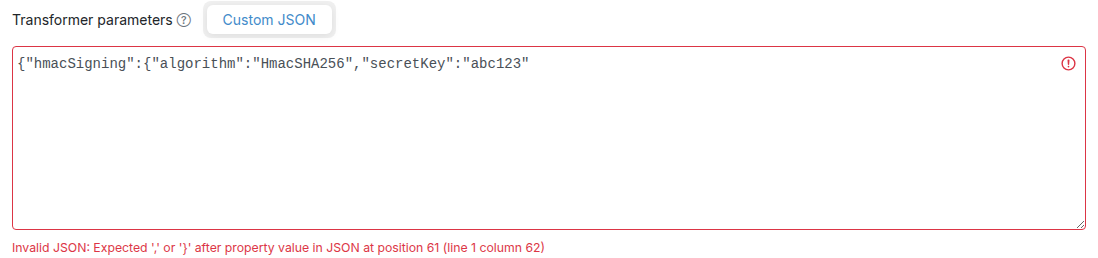
Advanced parameters, and scroll to the Transformer parameters panel.

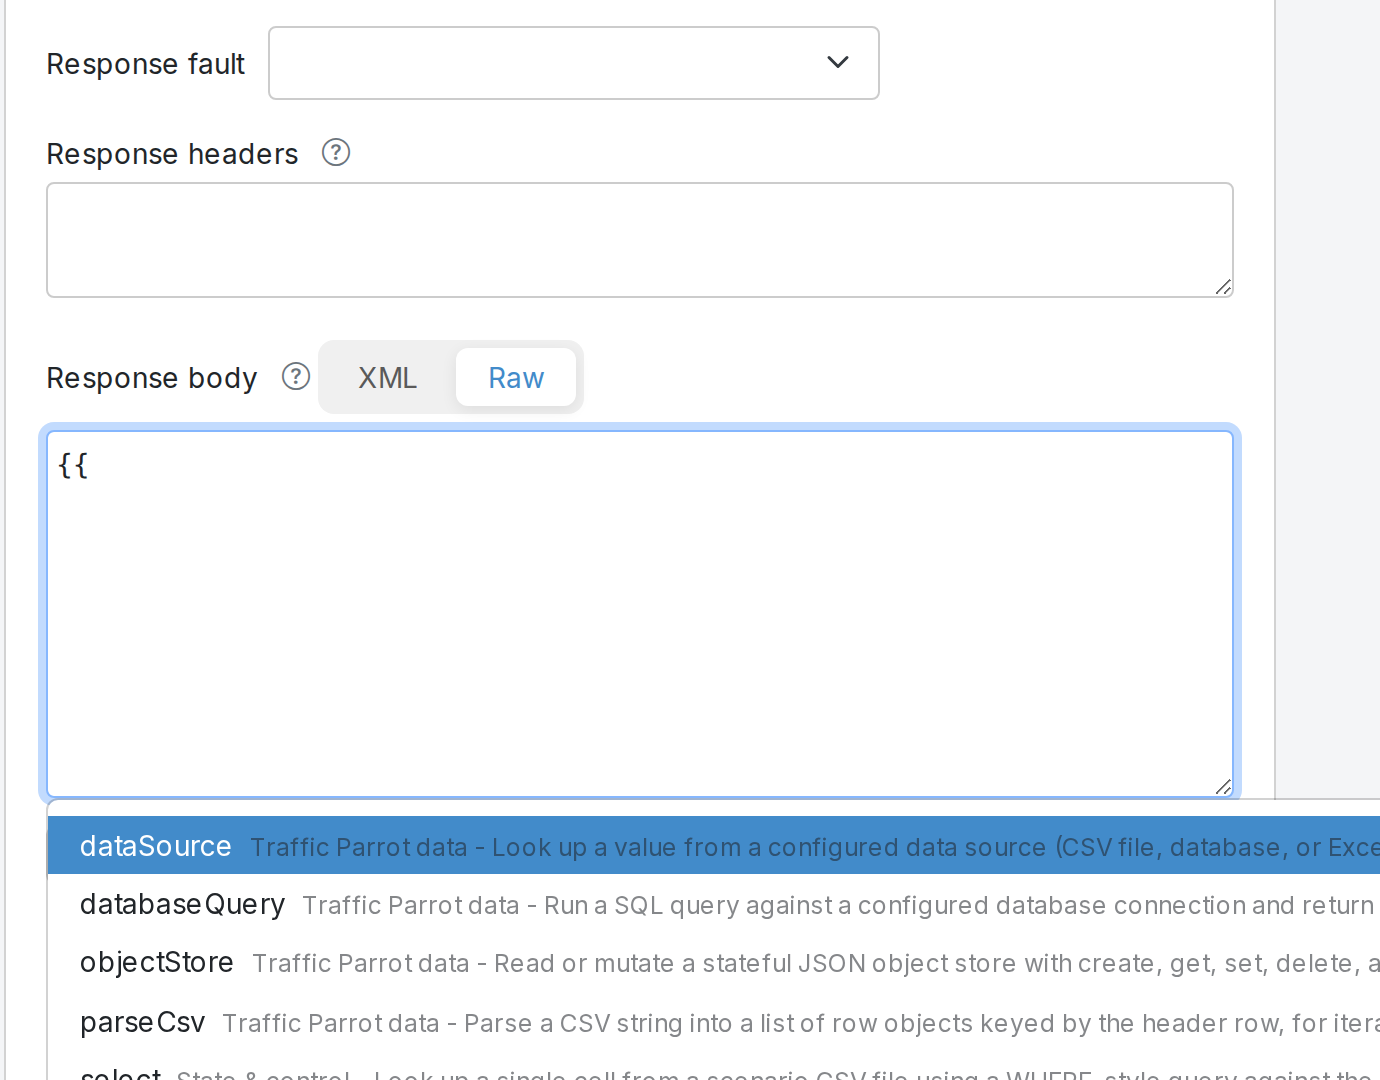
The panel exposes a JSON textarea bound to response.transformerParameters:

Transformer parameters editor in the Edit Mapping form, showing a formatted hmacSigning JSON block

  • The textarea is pretty-printed with 2-space indent when the form opens, and is auto-formatted on blur (when you click away from the textarea).
  • Invalid JSON is rejected on form submit with an inline error — the textarea must parse to a plain JSON object.
  • An empty or whitespace-only textarea is treated as "no transformer parameters" and serialises to nothing on disk.
  • Round-trip is semantically equal (whitespace is normalised; field order is preserved). A customer who never opens the mapping in the editor keeps their on-disk JSON unchanged.

Transformer parameters editor showing an inline error for invalid JSON on submit

You can also continue to edit transformerParameters by hand in the mapping JSON file on disk, or via the WireMock Admin API — the GUI editor reads and writes the same JSON shape.

Scope

The Custom JSON tab is a single JSON editor that covers any transformer reading from transformerParameters (for example hmacSigning and modifyResponse). Some transformers also have a schema-driven tab with structured fields next to the Custom JSON tab — HMAC Signing, and External Process for the external-process middleware transformer. A schema tab appears only when its transformer is toggled on, and it writes the same transformerParameters JSON the Custom JSON tab shows.

RequestToPdf

The RequestToPdf transformer converts the incoming request body into a PDF file. This is useful for simulating endpoints that generate PDF documents from input data.

Class: com.trafficparrot.virtualservice.extensions.responsetransformer.RequestToPdf

Usage:

  1. Add the transformer to your mapping's transformers array
  2. The transformer will convert the request body to PDF format
  3. The response will have appropriate PDF headers set automatically

Example mapping:

{
  "request": {
    "url": "/generate-pdf",
    "method": "POST"
  },
  "response": {
    "status": 200,
    "transformers": ["requestToPdf"]
  }
}

Note

The RequestToPdf transformer is ideal for test environments where you need to simulate PDF generation services without implementing the actual PDF creation logic.

ResponseToPdf

The ResponseToPdf transformer converts the original response body into a PDF file. This is useful for simulating endpoints that transform their responses into PDF documents.

Class: com.trafficparrot.virtualservice.extensions.responsetransformer.ResponseToPdf

Usage:

  1. Add the transformer to your mapping's transformers array
  2. The transformer will convert the response body to PDF format
  3. The original response status code is preserved
  4. PDF headers are added automatically if not already present

Example mapping:

{
  "request": {
    "url": "/get-report",
    "method": "GET"
  },
  "response": {
    "status": 200,
    "body": "<report><data>Sample content</data></report>",
    "transformers": ["responseToPdf"]
  }
}

Difference between RequestToPdf and ResponseToPdf

RequestToPdf converts the incoming request body to PDF, useful when simulating services that generate PDFs from client input.

ResponseToPdf converts the response body to PDF, useful when you want to transform existing response data into PDF format.

HlsStreamTransformer

The HlsStreamTransformer serves HLS (HTTP Live Streaming) video content from a single wildcard mapping. It dynamically generates .m3u8 playlist files and serves .ts video segments stored in the __files/ directory. This is useful for simulating video streaming APIs that deliver content via the HLS protocol.

Class: com.trafficparrot.virtualservice.extensions.responsetransformer.HlsStreamTransformer

How it works:

  1. You create a single mapping with a wildcard URL pattern (e.g. /stream/.*) and select hlsStreamTransformer from the response transformer dropdown
  2. The response body contains a JSON configuration describing the stream
  3. The transformer inspects the request URL to decide what to serve:
    • master.m3u8 requests return a generated master playlist pointing to a media playlist
    • Other .m3u8 requests return a media playlist listing the .ts segment files found in the configured directory
    • .ts requests serve the binary segment file directly from __files/

JSON configuration:

Field Required Description
segmentsDir Yes Path within __files/ where .ts segment files are stored (e.g. "stream/segments/")
playlistType No Playlist type. Use "vod" (default) for Video on Demand, which adds an #EXT-X-ENDLIST tag. Use "live" for live streams without an end marker.

Example mapping:

{
  "request": {
    "urlPattern": "/stream/.*",
    "method": "GET"
  },
  "response": {
    "status": 200,
    "body": "{\"segmentsDir\": \"stream/\", \"playlistType\": \"vod\"}",
    "transformers": ["hlsStreamTransformer"]
  }
}

Directory layout:

Place your .ts segment files in the __files/ directory under the path specified by segmentsDir:

__files/
  stream/
    segment0.ts
    segment1.ts
    segment2.ts

With the example mapping above, a video player can fetch /stream/master.m3u8 to get the master playlist, follow the link to /stream/media.m3u8 for the media playlist, and then download each .ts segment referenced in the playlist. All requests are handled by the single wildcard mapping.

Generating .ts segments

You can create .ts segment files from any video using ffmpeg:

ffmpeg -i input.mp4 -c copy -map 0 -f segment -segment_time 2 segment%d.ts

This splits the video into 2-second segments named segment0.ts, segment1.ts, etc.

Multi-variant ABR streaming

The transformer also supports multi-variant adaptive bitrate (ABR) streams. Instead of a single segmentsDir, the response body declares a variants array — one entry per bitrate rendition — and the transformer generates a master playlist that lists every variant. This simulates adaptive-bitrate switching so you can test a video player's ABR decision logic without depending on real-world network throughput, which is hard to control in automated tests.

JSON configuration with variants:

{
  "variants": [
    {"name": "low",  "bandwidth":  800000, "resolution":  "426x240", "segmentsDir": "stream/low/"},
    {"name": "mid",  "bandwidth": 2000000, "resolution":  "640x360", "segmentsDir": "stream/mid/"},
    {"name": "high", "bandwidth": 5000000, "resolution": "1280x720", "segmentsDir": "stream/high/"}
  ],
  "playlistType": "vod"
}

Variant fields:

Field Required Description
name Yes Identifier used in URLs and as the per-variant playlist filename. Must match the regex ^[a-z0-9][a-z0-9-]*$ (lowercase letters, digits, and hyphens; must start with a letter or digit) and be 1–32 characters. Names must be unique within the array.
bandwidth Yes Peak bitrate in bits per second, as a number (e.g. 2000000 for 2 Mbps). Written verbatim into the master playlist's #EXT-X-STREAM-INF:BANDWIDTH= attribute.
resolution Yes Frame size, formatted as "WIDTHxHEIGHT" (e.g. "1280x720"). Written verbatim into the master playlist's RESOLUTION= attribute.
segmentsDir Yes Path within __files/ where this variant's .ts segments are stored (e.g. "stream/high/"). Each variant should have its own directory.

playlistType works the same as in the single-variant configuration — "vod" (default) appends #EXT-X-ENDLIST to each media playlist, "live" omits it.

Variant name constraints

Variant names must match ^[a-z0-9][a-z0-9-]*$ and be 1–32 characters long. The following names are reserved and will be rejected: master, media, stream, segment, fallback. Duplicate names within the same variants array are also rejected.

URL routing:

With a wildcard mapping such as /stream/.*, the multi-variant transformer answers the following request shapes (where <base> is the matched prefix and <name> is one of the configured variant names):

  • /<base>/master.m3u8 — returns an #EXTM3U master playlist with one #EXT-X-STREAM-INF:BANDWIDTH=...,RESOLUTION=... line per variant, each pointing to <name>.m3u8.
  • /<base>/<name>.m3u8 — returns the media playlist for that variant, listing the .ts files found directly inside the variant's segmentsDir.
  • /<base>/<name>/segN.ts — returns the binary segment file from the variant's segmentsDir. Note the variant name appears as a path segment in the URL, not just a filename prefix.
  • If <name> does not match any configured variant, the transformer returns 404 with the body Unknown HLS variant: <name>.

Example multi-variant mapping:

{
  "request": {
    "urlPattern": "/stream/.*",
    "method": "GET"
  },
  "response": {
    "status": 200,
    "body": "{\"variants\":[{\"name\":\"low\",\"bandwidth\":800000,\"resolution\":\"426x240\",\"segmentsDir\":\"stream/low/\"},{\"name\":\"mid\",\"bandwidth\":2000000,\"resolution\":\"640x360\",\"segmentsDir\":\"stream/mid/\"},{\"name\":\"high\",\"bandwidth\":5000000,\"resolution\":\"1280x720\",\"segmentsDir\":\"stream/high/\"}],\"playlistType\":\"vod\"}",
    "transformers": ["hlsStreamTransformer"]
  }
}

Directory layout:

Each variant's .ts segments live in its own subdirectory under __files/:

__files/
  stream/
    low/
      segment0.ts
      segment1.ts
      segment2.ts
    mid/
      segment0.ts
      segment1.ts
      segment2.ts
    high/
      segment0.ts
      segment1.ts
      segment2.ts

Deterministic variant switching for tests

Real-world ABR is throughput-driven, which makes it hard to assert a player switched up or down in an automated test. You can force the player to switch at a deterministic point by combining the multi-variant mapping with a second, higher-priority mapping that selectively breaks one variant's segment fetches.

Forced down-switch (higher-priority 503 stub):

Add a stub with a higher priority than the wildcard transformer mapping that matches a single variant's segment URLs and returns 503. The player attempts the higher variant, hits the failure on its first segment, and drops to the next-best variant. Because WireMock evaluates lower priority numbers first, give the failing stub "priority": 1 and leave the transformer mapping at the default priority (5):

{
  "priority": 1,
  "request": {
    "urlPattern": "/stream/high/.*\\.ts",
    "method": "GET"
  },
  "response": {
    "status": 503
  }
}

Forced up-switch (stub-level scenario state):

"Scenarios" here means the WireMock stub-level state machine, not Traffic Parrot scenario directories

Traffic Parrot has two unrelated concepts that share the word "scenario":

  • Traffic Parrot scenarios — the on-disk folder layout under scenarios/ that you switch between via the GUI or /api/scenarios. See the Testing with scenarios section of the user guide.
  • Stub-level scenario state (used in this section) — a per-stub state machine feature that has been part of the underlying WireMock engine since 2.x. You opt a stub into it by adding the scenarioName, requiredScenarioState, and optionally newScenarioState fields to the mapping JSON.

These are independent. Switching the active Traffic Parrot scenario does not change WireMock stub state, and vice versa.

To assert a player upgrades to a higher variant after the network "improves", combine the wildcard transformer mapping with two stubs on the high variant's segments that opt into a shared scenarioName. In the initial state the high segments fail with 503, so the player settles on the middle variant. The test then advances the named scenario to HIGH_READY — the next probe of the high variant succeeds and the player upgrades:

{
  "priority": 1,
  "scenarioName": "hls-abr",
  "requiredScenarioState": "Started",
  "request": {
    "urlPattern": "/stream/high/.*\\.ts",
    "method": "GET"
  },
  "response": {
    "status": 503
  }
}
{
  "priority": 1,
  "scenarioName": "hls-abr",
  "requiredScenarioState": "HIGH_READY",
  "request": {
    "urlPattern": "/stream/high/.*\\.ts",
    "method": "GET"
  },
  "response": {
    "status": 200
  }
}

The two stubs above are tied together by the shared scenarioName ("hls-abr"). "Started" is the implicit initial state; you advance to "HIGH_READY" at test runtime by calling the /__admin/scenarios/<name>/state admin endpoint:

PUT http://localhost:18080/api/http/__admin/scenarios/hls-abr/state
Content-Type: application/json

{"state": "HIGH_READY"}

The call goes to the Traffic Parrot GUI/API port (localhost:18080) — the same port a test already uses for /api/scenarios, /api/state, and the request journal. The /api/http/__admin/... prefix is the Traffic Parrot write-through that forwards the request to the underlying WireMock SetScenarioStateTask handler.

After advancing the state, assert that the player upgraded by querying the request journal (GET http://localhost:18080/api/http/__admin/requests) and checking that segments from /stream/high/ appear in it after the state transition.

Backwards compatibility

The single-segmentsDir configuration described earlier is still fully supported. The transformer checks for a variants array first; if it is absent, it falls back to the legacy single-bitrate behaviour. Existing mappings do not need to be migrated.

HmacSigningTransformer

The HmacSigningTransformer computes an HMAC signature of the response body and adds it as a Base64-encoded response header. This is useful for simulating APIs that require signature verification, such as webhook callbacks from services like GitHub, Slack, or Stripe, and API gateways that use HMAC authentication (e.g., Azure, AWS).

Class: com.trafficparrot.virtualservice.extensions.responsetransformer.HmacSigningTransformer

How it works:

  1. The transformer runs after all Handlebars templates have been evaluated
  2. It reads the HMAC configuration from the mapping's transformerParameters
  3. It computes the HMAC of the final response body bytes using the configured algorithm and secret key
  4. The Base64-encoded signature is added as a response header with the configured name

Configuration parameters:

HMAC signing is configured via the transformerParameters.hmacSigning object in the mapping JSON:

Parameter Required Description
algorithm Yes The HMAC algorithm to use: HmacSHA1, HmacSHA256, or HmacSHA512
secretKey Yes The secret key used to compute the HMAC signature
headerName Yes The name of the response header that will contain the HMAC signature (e.g., X-Signature, X-Hub-Signature-256)

Example mapping:

{
  "request": {
    "url": "/webhook/callback",
    "method": "POST"
  },
  "response": {
    "status": 200,
    "body": "{\"event\": \"payment.completed\", \"amount\": 99.99}",
    "headers": {
      "Content-Type": "application/json"
    },
    "transformerParameters": {
      "hmacSigning": {
        "algorithm": "HmacSHA256",
        "secretKey": "my-secret-key",
        "headerName": "X-Signature"
      }
    }
  }
}

The response will include the JSON body and an X-Signature header containing the Base64-encoded HMAC-SHA256 signature of that body.

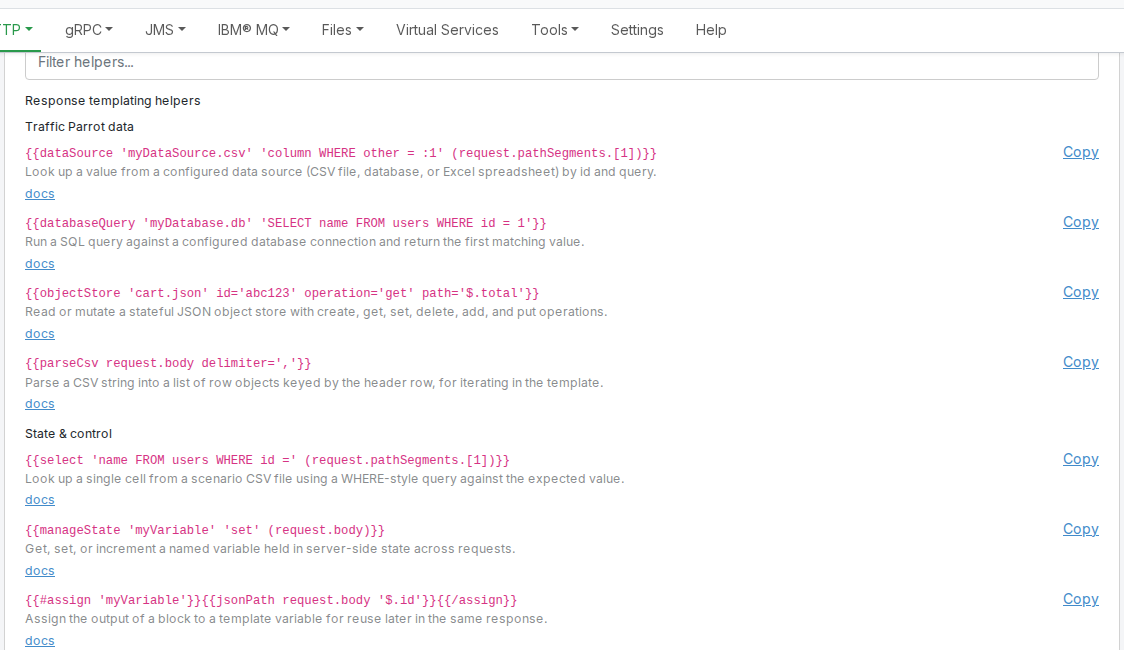
You can author the transformerParameters.hmacSigning block in the Transformer parameters editor in the Edit Mapping form, edit the mapping JSON file directly on disk, or post the mapping via the WireMock Admin API — all three paths read and write the same JSON shape.

The HMAC is computed on the final response body bytes, so the signature matches exactly what the client receives. If the response body is empty, the HMAC is computed on an empty byte array.

Prerequisites

HMAC signing requires the trafficparrot.http.modify.response.enabled property to be set to true (this is the default). When disabled, the HMAC header will not be added.

Error handling

If an unsupported algorithm is specified or the secret key is empty, the transformer logs a warning and returns the response unchanged (no signature header is added). Supported algorithms are HmacSHA1, HmacSHA256, and HmacSHA512.

Base64DecodeBodyResponseTransformer

The base64-decode-body transformer Base64-decodes the rendered response body and serves the resulting bytes as the response payload. It is the opt-in pairing for any helper that produces Base64-encoded binary data — in particular, the {{image}} helper — and lets you return real binary content (PNG, PDF, ZIP, etc.) from a JSON mapping body.

Class: com.trafficparrot.virtualservice.extensions.responsetransformer.Base64DecodeBodyResponseTransformer

How it works:

  1. Traffic Parrot renders the response body through Handlebars as normal, producing a Base64 string.
  2. The transformer runs after Handlebars and Base64-decodes that string into raw bytes.
  3. The decoded bytes are served as the response body. The status code and headers from the mapping (including Content-Type) are preserved — the transformer does not set any headers itself.

The transformer is opt-in — it only runs on mappings that explicitly list "base64-decode-body" in the response transformers array. Existing mappings are unaffected.

Example mapping (PNG via the {{image}} helper):

{
  "request": { "method": "GET", "url": "/avatar" },
  "response": {
    "status": 200,
    "headers": { "Content-Type": "image/png" },
    "body": "{{image width=400 height=300}}",
    "transformers": ["base64-decode-body"]
  }
}

Set the Content-Type header in the mapping's headers field so the client knows how to interpret the decoded bytes. The transformer itself is format-agnostic — it will happily decode any valid Base64 input and serve it as bytes.

Error handling

If the rendered body is not valid Base64 — for example, because the template contains surrounding text or an unrelated helper that emits non-Base64 output — the response fails with HTTP 500 and a body of Invalid Base64 body: <details>. Validation happens at request time; the mapping is accepted at save time regardless.

External-process middleware

The external-process transformer passes the HTTP response through a user-supplied executable — the "middleware" — written in any language. For each matched request on a mapping that opts in, Traffic Parrot serialises a versioned JSON envelope (the matched request plus the response about to be sent) to the executable's stdin, and reads the mutated envelope back from its stdout. Only the response section of the returned envelope is applied (status, headers, body). This is the same out-of-process middleware idea that users coming from Hoverfly will recognise, so you can reuse a script written in Python, Go, Node, a shell, or any other runtime that can read stdin and write stdout.

Security: off by default, runs as the Traffic Parrot user, no sandbox

The middleware executable runs as a native OS process with the privileges of the Traffic Parrot process and no sandbox. The feature is therefore off by default and must be explicitly enabled, and even when enabled only executables that live under a single operator-configured directory may be invoked. Read the Security and threat model notes below before enabling it, and enable it only on trusted hosts.

Class: com.trafficparrot.virtualservice.extensions.responsetransformer.ExternalProcessTransformer (transformer name: external-process)

Enabling the feature

Two properties in trafficparrot.properties control the feature. Both must be set before any external-process middleware will run:

Property Default Description
trafficparrot.http.externalprocess.enabled false Must be set to true to activate the feature. While it is false, a mapping that references the external-process transformer is inert — the response is returned unchanged and a warning is logged.
trafficparrot.http.externalprocess.allowedDir (empty) Required. A single directory. Only executables whose canonical (symlink-resolved) path is under this directory may be invoked. An empty value means nothing is allowed, even when the feature is enabled — so you must set this to a dedicated directory holding your vetted middleware.
# trafficparrot.properties
trafficparrot.http.externalprocess.enabled=true
trafficparrot.http.externalprocess.allowedDir=/opt/tp-middleware

When the feature is enabled, Traffic Parrot checks allowedDir once at startup. If it is empty, does not exist, is not a directory, or is non-canonical (resolves to a different canonical path), a single warning of the form external-process allow-list misconfiguration: … is logged so you learn of the problem at startup rather than at the first matched request. This check is warn-only — the server still starts, and the per-invocation allow-list enforcement described below is unchanged.

Configuring a mapping

A mapping opts in by listing external-process in the response's transformers array and supplying its configuration under transformerParameters.external-process:

{
  "request": {
    "url": "/api/widgets/42",
    "method": "GET"
  },
  "response": {
    "status": 200,
    "body": "{\"name\":\"widget\"}",
    "headers": { "Content-Type": "application/json" },
    "transformers": ["external-process"],
    "transformerParameters": {
      "external-process": {
        "executable": "/opt/tp-middleware/uppercase-body.py",
        "args": [],
        "timeoutMs": 5000,
        "onError": "fail-open"
      }
    }
  }
}
Parameter Required Description
executable Yes Path to the executable to run. Its canonical (symlink-resolved) path must be under allowedDir, otherwise the middleware is not invoked and onError is applied.
args No Extra command-line arguments passed to the executable, as a JSON array of strings. Defaults to an empty list.
timeoutMs No Per-invocation timeout in milliseconds (default 5000). If the process has not exited within this time it is forcibly killed and onError is applied.
onError No What to do when the middleware fails (default fail-open). See Failure handling below.

Configuring it in the editor GUI

You do not have to hand-edit the mapping JSON. The external-process transformer can be enabled and configured directly in the HTTP mapping editor. Open the Add HTTP mapping or Edit HTTP mapping form, expand Advanced parameters, and scroll to the Response transformers list.

The option only appears when the feature is enabled

The ExternalProcessTransformer toggle is offered in the editor only when an operator has set trafficparrot.http.externalprocess.enabled=true (see Enabling the feature above). When the feature is off — its default — the toggle is not shown at all, so a mapping author cannot opt a response into external-process middleware that the operator has not turned on. Selecting the transformer in the GUI does not bypass either gate: the trafficparrot.http.externalprocess.allowedDir allow-list still governs which executables may actually run at request time, exactly as it does for a mapping authored in JSON or via the API.

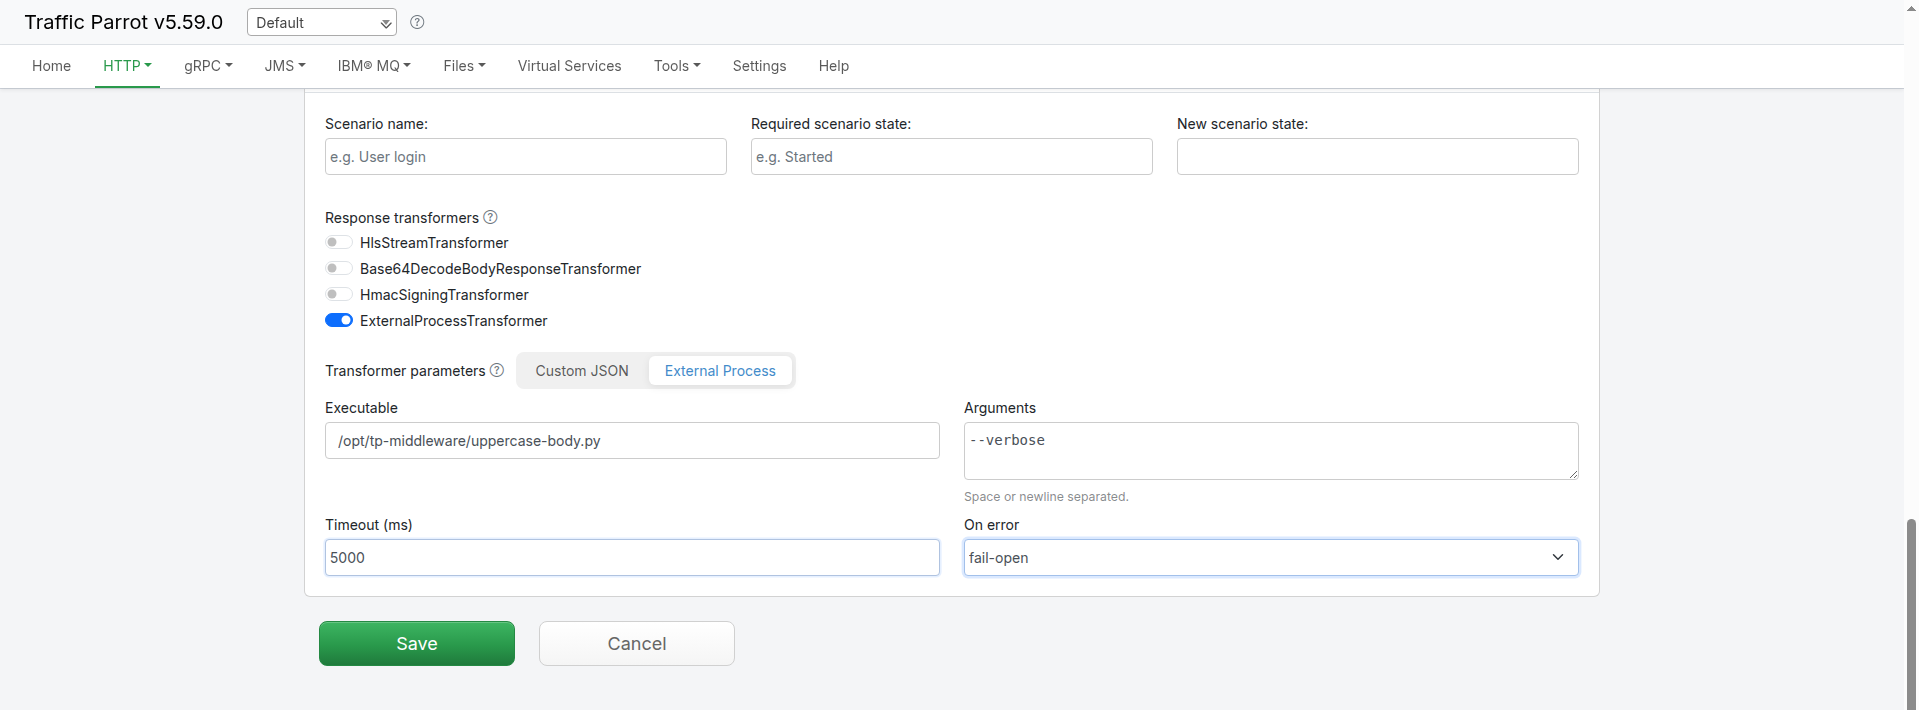
Toggle ExternalProcessTransformer on. An External Process tab then appears in the Transformer parameters panel below, with a structured field for each parameter:

  • Executable — the path to the executable. Its canonical path must be under allowedDir, otherwise the middleware is not invoked and onError is applied at request time.
  • Arguments — extra command-line arguments, space or newline separated. They are stored as a JSON array. Leave it empty to pass no arguments (no args key is written). Arguments that contain embedded spaces are not supported by this field — use the Custom JSON tab for those.
  • Timeout (ms) — the per-invocation timeout in milliseconds, stored as a JSON number. Leave it empty to use the transformer's default of 5000.
  • On errorfail-open (pass the original response through unchanged) or fail-closed (return an error). Leave it empty to use the default, fail-open. See Failure handling.

Saving the mapping adds "external-process" to the response's transformers list and writes the configuration to transformerParameters.external-process — the exact same JSON shown under Configuring a mapping above. The editor is a front end for the existing capability; it adds no new runtime behaviour. Re-opening the mapping hydrates the fields back from the stored block (a stored block that omits timeoutMs or onError re-opens with those fields empty, and the transformer's 
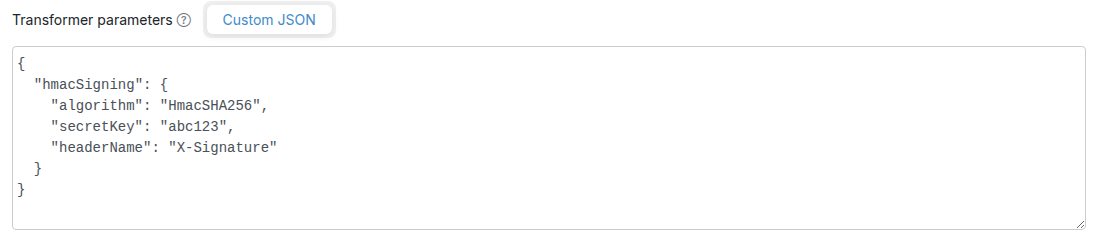
defaults apply). The Custom JSON tab remains available for any configuration the structured fields do not cover.

In this release

External-process middleware can be configured in the HTTP mapping editor, in the mapping JSON on disk, or via the WireMock Admin API — all three read and write the same JSON shape. It applies to HTTP responses only: the executable may mutate the response (status, headers, body), but changes it makes to the meta or request sections of the envelope are ignored — request mutation is not supported in this release.

Supported on Linux and macOS in this release. The transformer spawns whatever executable you configure, so the mechanism itself is not OS-specific, but the bundled example middleware is POSIX (Python and shell). On Windows you would need to supply a Windows-native executable (for example a .bat/.cmd wrapper or an .exe); first-class Windows examples and support are planned for a later release.

The JSON envelope (version 1)

Traffic Parrot writes a single JSON object to the executable's stdin and expects the same object, with the response section mutated, on stdout. The shape is versioned via meta.contractVersion so middleware can refuse an envelope it does not understand.

{
  "meta": {
    "contractVersion": "1",
    "protocol": "http",
    "transformer": "external-process",
    "mappingId": "<stub uuid>"
  },
  "request": {
    "method": "GET",
    "url": "/api/widgets/42",
    "headers": { "Accept": ["application/json"] },
    "body": "",
    "bodyEncoding": "identity"
  },
  "response": {
    "status": 200,
    "headers": { "Content-Type": ["application/json"] },
    "body": "{\"name\":\"widget\"}",
    "bodyEncoding": "identity"
  }
}
Field Description
meta.contractVersion Always "1" in this release. Bumped on any breaking change — middleware should check it and refuse an unknown major version.
meta.protocol Always "http" in this release.
meta.transformer Always "external-process".
meta.mappingId The stub mapping's UUID. Opaque to Traffic Parrot — provided for the middleware's own logging or routing.
request The matched request as read-only context: method, url, headers (a multimap of name → array of values), body, and bodyEncoding.
response The response about to be sent — the section the middleware mutates: status, headers (multimap), body, and bodyEncoding.
bodyEncoding "identity" when the body is valid UTF-8 text; "base64" when the body is binary. A middleware that does not need to touch the body must echo it back unchanged, along with its bodyEncoding.

The middleware mutates the response object only and prints the whole envelope back. Traffic Parrot reads just the returned response — any changes to meta or request are ignored.

A minimal middleware example

This Python script reads the envelope, uppercases the response body when it is identity-encoded (leaving base64 binary bodies untouched), stamps a marker header, and writes the envelope back:

#!/usr/bin/env python3
import json, sys

env = json.load(sys.stdin)
resp = env["response"]
if resp.get("bodyEncoding", "identity") == "identity":
    resp["body"] = resp.get("body", "").upper()
resp.setdefault("headers", {})["X-Transformed-By"] = ["uppercase-body.py"]
json.dump(env, sys.stdout)

Save this as uppercase-body.py in your allowedDir, make it executable (chmod +x), point a mapping's executable at it, and the matched response body comes back uppercased with an X-Transformed-By header.

Failure handling

Four conditions count as a middleware failure: a non-zero exit code, a timeout (the process is forcibly killed at timeoutMs), malformed JSON on stdout, and a missing or disallowed executable (including a path that does not resolve under allowedDir). Each is logged, and the onError setting decides what the client receives:

onError Behaviour on failure
fail-open (default) The original, unmodified response is returned — the middleware failure is invisible to the client.
fail-closed An HTTP 500 is returned, so a broken middleware surfaces as a failed request rather than silently passing the original response through.

Performance: one process per matched request

In this release Traffic Parrot spawns a fresh process for every matched request on a mapping that uses the transformer. The dominant cost is interpreter/runtime startup, so a lightweight script keeps the per-request overhead small. Because the transformer is opt-in per mapping, this cost only lands on the mappings that use it — all other mappings are unaffected.

Security and threat model

The middleware executable runs as a native OS process with the privileges of the Traffic Parrot process and is not sandboxed — it can do anything that the operating-system user running Traffic Parrot can do. Treat enabling this feature as granting code-execution rights to whoever can edit mappings. To use it safely:

  • Enable it only on trusted hosts; it is off by default for this reason.
  • Point allowedDir at a dedicated directory that holds only vetted middleware scripts an operator has reviewed, and keep that directory write-protected from untrusted users.
  • Run Traffic Parrot as an unprivileged OS user so the blast radius of any middleware is limited.
  • Use the per-invocation timeoutMs to bound runaway processes, and apply operating-system resource limits (for example ulimit or cgroups) for memory and process caps — Traffic Parrot does not impose these itself.

Create your own custom extensions

Introduction

In order to create your own HTTP extensions basic Java programming language knowledge is required. We use Java to write extensions because it is a simple to use and yet very powerful language. It is also the most popular programming language in the world. If this is not something you can do, we can create the extensions for you instead.

There are two types of extensions you can create:
  • Custom handlebar helpers. Simple, for basic usage. These extensions can be used to transform or generate dynamically the response content.
  • Custom response transformers for HTTP, JMS and Native IBM MQ. Complex, for advanced usage. These extensions can do advanced transformations, routing of responses, and many more.

Custom handlebar helpers

Traffic Parrot allows for Handlebars notation in the responses. They are typically used to add dynamic content to the responses. They can be used for both HTTP and JMS.

For example, all of these existing extensions are handlebar helpers: If you would like to add new Handlebars Helpers, have a look at the following example:
  1. Download and open the SDK workspace project in an IDE like IntelliJ IDEA or Eclipse
  2. Explore the project and the Java classes available in the SDK. Look for usages of TrafficParrotHelper They provide example usages of Handlebars Helpers. Have a look at both main and test classes.
  3. Create a new extension class based on the examples provided in the SDK (by extending TrafficParrotHelper class). For example:
    package com.trafficparrot.sdk.example.http.template;
    
    import com.github.jknack.handlebars.Handlebars;
    import com.github.jknack.handlebars.Options;
    import com.trafficparrot.sdk.handlebars.TrafficParrotHelper;
    
    import java.io.IOException;
    import java.util.Random;
    
    public class RandomInteger extends TrafficParrotHelper<Object> {
        @Override
        public Handlebars.SafeString doApply(Object context, Options options) throws IOException {
            return new Handlebars.SafeString(String.valueOf(new Random().nextInt()));
        }
    }
  4. Build the project ./mvnw clean install
  5. Copy target/trafficparrot-sdk-workspace-x.y.z.jar
    to directory trafficparrot-x.y.z/lib/virtualservice-x.y.z to use with HTTP
    or to directory trafficparrot-x.y.z/lib/external to use with JMS
  6. Look for properties trafficparrot.http.handlebars.helpers and trafficparrot.jms.handlebars.helpers in trafficparrot.properties and add your new class to the list of extension classes there. (Why do I have to edit the extensions properties every time?)
  7. Stop Traffic Parrot
  8. Start Traffic Parrot
  9. If the name of the class you have created is RandomInteger the extension you will use in response templates will be called {{randomInteger}} by default. The name can be changed by implementing the TrafficParrotHelper.getName method.
  10. Edit an existing mapping and put {{randomInteger}} anywhere in the response body.
  11. Make a request to the virtual service
  12. The response you receive should contain the randomly generated integer.

Custom HTTP response transformers

Traffic Parrot allows for creating custom HTTP response transformers. They allow for altering any part of the HTTP response in any way you like, and have access to the request data.

If you would like to add a new HTTP response transformer, have a look at the following example:
  1. Download and open the SDK workspace project in an IDE like IntelliJ IDEA or Eclipse
  2. Explore the project and the Java classes available in the SDK. They provide example usages of HTTP response transformers. For example, see com.trafficparrot.sdk.example.http.RandomServerFailure
    Have a look at both main and test classes.
  3. Create a new extension class based on the examples provided in the SDK (by extending HttpResponseTransformer class). For example you can use the sample provided in the SDK com.trafficparrot.sdk.example.http.RandomServerFailure
    package com.trafficparrot.sdk.example.http.responsetransformer;
    
    import com.github.tomakehurst.wiremock.common.FileSource;
    import com.github.tomakehurst.wiremock.extension.Parameters;
    import com.github.tomakehurst.wiremock.http.Request;
    import com.github.tomakehurst.wiremock.http.Response;
    import com.trafficparrot.sdk.http.HttpResponseTransformer;
    
    import java.util.Random;
    
    import static com.github.tomakehurst.wiremock.http.HttpHeaders.noHeaders;
    
    public class RandomServerFailure extends HttpResponseTransformer {
        @Override
        protected Response doTransform(Request request, Response response, FileSource fileSource, Parameters parameters) {
            if (new Random().nextBoolean()) {
                return Response.Builder
                        .like(response)
                        .but()
                        .status(500)
                        .headers(noHeaders())
                        .body("Server error!")
                        .build();
            } else {
                return response;
            }
        }
    
        @Override
        public boolean applyGlobally() {
            return true;
        }
    
        @Override
        public String getName() {
            return getClass().getSimpleName();
        }
    }
  4. Build the project by running maven ./mvnw clean install
  5. Make sure the build is successful, you should see: [INFO] BUILD SUCCESS
  6. Copy target/trafficparrot-sdk-workspace-x.y.z.jar to directory trafficparrot-x.y.z/lib/external
  7. Look for property trafficparrot.http.responsetransformers in Traffic Parrot properties file trafficparrot-x.y.z/trafficparrot.properties and add your new class to the list of extension classes there. So you should see
    trafficparrot.http.responsetransformers=com.trafficparrot.sdk.example.http.RandomServerFailure
  8. Stop Traffic Parrot
  9. Start Traffic Parrot
  10. Create a HTTP request to response mapping in Traffic Parrot if you do not have one yet. For example, make a mapping "/hello" that return a 200 response with body "Hello World!"
  11. Note, since the code in your matcher has
        @Override
        public boolean applyGlobally() {
            return true;
        }
    
    it will be applied globally for all mappings.
  12. (optional) step if you do not want the transformer to apply globally

    Note, if you do not set applyGlobally to true then you need to assign the transformer to specific mappings.

    The "transformers" field is not exposed in the Traffic Parrot user interface yet, so you need to define the transformers JSON mapping file directly.

    To do that, you can edit that mapping in a text editor and put "transformers": ["RandomServerFailure"] anywhere in the response section, for example:
    "response" : {
      "status" : 200,
      "body" : "Hello world!!!",
      "transformers": ["RandomServerFailure"]
    }
  13. Make a few requests to the virtual service with a web browser, Postman or curl.
  14. The response you receive should randomly fail, as defined in the response transformer RandomServerFailure.

Custom JMS response transformers

Traffic Parrot allows for creating custom JMS response transformers. They allow for altering any part of the JMS response message in any way you like, and have access to the request data.

If you would like to add a new JMS response transformer, have a look at the following example:
  1. Download and open the SDK workspace project in an IDE like IntelliJ IDEA or Eclipse
  2. Explore the project and the Java classes available in the SDK. They provide example usages of JMS response transformers. Look for usages of JmsResponseTransformer and TextJmsResponseTransformer. Have a look at both main and test classes.
  3. Create a new extension class based on the examples provided in the SDK (by extending TextJmsResponseTransformer class). For example:
    package com.trafficparrot.sdk.example.jms;
    
    import com.github.tomakehurst.wiremock.extension.Parameters;
    import com.github.tomakehurst.wiremock.common.Json;
    import com.trafficparrot.sdk.jms.Destination;
    import com.trafficparrot.sdk.jms.JmsResponse;
    import com.trafficparrot.sdk.jms.JmsResponseBuilder;
    import com.trafficparrot.sdk.jms.TextJmsResponseTransformer;
    
    import javax.jms.JMSException;
    import javax.jms.TextMessage;
    // Note: both javax.jms and jakarta.jms imports are supported. Legacy javax.jms plugins
    // continue to work without source changes. Migrating to jakarta.jms is recommended as a next step.
    
    public class ChooseResponseQueueBasedOnRequestMessageBody extends TextJmsResponseTransformer {
        @Override
        protected JmsResponse doTransform(Destination requestDestination, TextMessage requestMessage, JmsResponse response, Parameters parameters) throws JMSException {
            Req payment = Json.read(requestMessage.getText(), Req.class);
            String newDestinationName;
            if ("foo".equals(payment.requestField)) {
                newDestinationName = "response_queue_1";
            } else if ("bar".equals(payment.requestField)) {
                newDestinationName = "response_queue_2";
            } else {
                logger.error("Destination not configured for req.requestField '" + payment.requestField + "'");
                throw new UnsupportedOperationException(payment.requestField);
            }
            logger.info("Redirecting message to " + newDestinationName);
    
            return new JmsResponseBuilder()
                    .like(response)
                    .withDestination(new Destination(newDestinationName, response.destination.type))
                    .build();
        }
    }
    
    class Req {
        public String requestField;
    }
  4. Build the project ./mvnw clean install
  5. Copy trafficparrot-x.y.z/lib/external target/trafficparrot-sdk-workspace-x.y.z.jar to directory
  6. Look for property trafficparrot.jms.responsetransformers in trafficparrot.properties and add your new class to the list of extension classes there. (Why do I have to edit the extensions properties every time?)
  7. Stop Traffic Parrot
  8. Start Traffic Parrot
  9. Edit an existing JMS mapping and select ChooseResponseQueueBasedOnRequestMessageBody from the "Response transformer" dropdown.
  10. Start the JMS virtual service in replay mode and send a JMS request with content {"requestField": "foo"}
  11. The response message should be sent to queue response_queue_1
  12. Send a JMS request with content {"requestField": "bar"}
  13. The response message should be sent to queue response_queue_2

Custom Native IBM MQ response transformers

Traffic Parrot allows for creating custom Native IBM MQ response transformers. They allow for altering any part of the Native IBM MQ response message in any way you like, and have access to the request data.

If you would like to add a new Native IBM MQ response transformer, have a look at the following example:
  1. Download and open the SDK workspace project in an IDE like IntelliJ IDEA or Eclipse
  2. Explore the project and the Java classes available in the SDK. They provide example usages of JMS response transformers. Look for usages of IbmMqResponseTransformer.
  3. Create a new extension class based on the examples provided in the SDK (by extending IbmMqResponseTransformer class). See below for an example.
  4. Here is an example of a response transformer class. The class is a quite complex example, in which we transform and proxy the original request message, so there is no "response message" as such, but a "proxied and transformed request message" which is treated by traffic parrot as a response message. The purpose of this example is to demonstrate how powerful the plugins can be.
    package com.trafficparrot.sdk.example.nativeibmmq;
    
    import com.github.tomakehurst.wiremock.extension.Parameters;
    import com.ibm.mq.MQMessage;
    import com.trafficparrot.sdk.ibmmq.IbmMqResponse;
    import com.trafficparrot.sdk.ibmmq.IbmMqResponseTransformer;
    import com.trafficparrot.sdk.ibmmq.SdkIbmMqUtils;
    import com.trafficparrot.sdk.jms.Destination;
    import org.slf4j.Logger;
    import org.slf4j.LoggerFactory;
    import org.w3c.dom.Document;
    import org.xml.sax.SAXException;
    
    import javax.xml.parsers.DocumentBuilder;
    import javax.xml.parsers.DocumentBuilderFactory;
    import javax.xml.parsers.ParserConfigurationException;
    import javax.xml.xpath.XPathExpressionException;
    import javax.xml.xpath.XPathFactory;
    import java.io.ByteArrayInputStream;
    import java.io.IOException;
    import java.text.ParseException;
    import java.text.SimpleDateFormat;
    import java.util.Date;
    import java.util.Optional;
    import java.util.Properties;
    
    import static com.trafficparrot.sdk.PropertiesHelper.readPropertiesFile;
    import static com.trafficparrot.sdk.ibmmq.DestinationLookup.USE_MAPPING_RESPONSE_DESTINATION;
    import static com.trafficparrot.sdk.ibmmq.SdkIbmMqUtils.readMessageBodySkipHeaders;
    import static com.trafficparrot.sdk.ibmmq.SdkIbmMqUtils.setMessageBody;
    
    
    public class TransformAndProxyRequestMessage extends IbmMqResponseTransformer {
        private static final Logger LOGGER = LoggerFactory.getLogger(TransformAndProxyRequestMessage.class);
    
        private static final long FOUR_YEARS_IN_MILLIS = 4L * 365 * 24 * 60 * 60 * 1000;
    
        public static final String DEFAULT_REAL_REQUEST_QUEUE_KEY = "default.real.request.queue";
        public static final String SIT1_REAL_REQUEST_QUEUE_KEY = "sit1.real.request.queue";
        public static final String SIT1_ENVIRONMENT_IDENTIFIER_KEY = "sit1.environment.identifier";
    
        public static final String TRANSFORM_AND_PROXY_PROPERTIES_FILENAME = "transform-and-proxy.properties";
    
        // You can put this file in the main Traffic Parrot directory where all the other properties files are
        private final Properties properties = readPropertiesFile(TRANSFORM_AND_PROXY_PROPERTIES_FILENAME);
    
        @Override
        @SuppressWarnings("UnnecessaryLocalVariable")
        protected IbmMqResponse doTransform(Destination requestDestination, MQMessage requestMessage, IbmMqResponse mappingResponse, Parameters parameters) throws Exception {
            MQMessage proxyResponseMessage = requestMessage;
            setReplyToQ(proxyResponseMessage);
            resetMqPropertiesThatAreSetByMq(proxyResponseMessage);
            moveDatesInBody(requestMessage, proxyResponseMessage);
            return new IbmMqResponse(mappingResponse.destination, proxyResponseMessage, mappingResponse.fixedDelayMilliseconds, Optional.of(USE_MAPPING_RESPONSE_DESTINATION));
        }
    
        private void setReplyToQ(MQMessage proxiedMessage) {
            proxiedMessage.replyToQueueName = getReplyToQueue(proxiedMessage);
        }
    
        private String getReplyToQueue(MQMessage requestMessage) {
            String messageAsString = SdkIbmMqUtils.mqMessageToString(requestMessage);
            LOGGER.info("Transformer message converted to string: " + messageAsString);
            String sitEnvironmentId = properties.getProperty(SIT1_ENVIRONMENT_IDENTIFIER_KEY);
            if (messageAsString.contains(sitEnvironmentId)) {
                String sit1RealRequestQueue = properties.getProperty(SIT1_REAL_REQUEST_QUEUE_KEY);
                LOGGER.info("Transformer using " + sit1RealRequestQueue);
                return sit1RealRequestQueue;
            } else {
                String defaultRealRequestQueue = properties.getProperty(DEFAULT_REAL_REQUEST_QUEUE_KEY);
                LOGGER.info("Transformer using " + defaultRealRequestQueue);
                return defaultRealRequestQueue;
            }
        }
    
        private void moveDatesInBody(MQMessage requestMessage, MQMessage proxyResponseMessage) throws IOException, ParserConfigurationException, XPathExpressionException, SAXException, ParseException {
            // parse the XML request body
            String originalMessageBody = readMessageBodySkipHeaders(requestMessage);
            DocumentBuilderFactory abstractFactory = DocumentBuilderFactory.newInstance();
            DocumentBuilder factory = abstractFactory.newDocumentBuilder();
            Document doc = factory.parse(new ByteArrayInputStream(originalMessageBody.getBytes()));
            String requestDateString = XPathFactory.newInstance().newXPath().compile("/transactions/get/startDate/text()").evaluate(doc);
            SimpleDateFormat format = new SimpleDateFormat("yyyy-MM-dd");
            Date requestDate = format.parse(requestDateString);
    
            // calculate the new date (in the past)
            Date movedDate = new Date(requestDate.getTime() - FOUR_YEARS_IN_MILLIS);
            String movedDateString = format.format(movedDate);
    
            // set new date in the response
            String newMessageBody = originalMessageBody.replace(requestDateString, movedDateString);
            setMessageBody(proxyResponseMessage, newMessageBody);
        }
    
        private void resetMqPropertiesThatAreSetByMq(MQMessage proxyResponseMessage) {
            proxyResponseMessage.putDateTime = null;
            proxyResponseMessage.putApplicationName = "Traffic Parrot transformer proxy " + getClass().getSimpleName();
        }
    }
    
  5. Build the project ./mvnw clean install
  6. Copy target/trafficparrot-sdk-workspace-x.y.z.jar to directory trafficparrot-x.y.z/lib/external
  7. In the mapping JSON file define ibmMqResponseTransformerClassName, for example
    {
      "mappingId" : "1001",
      "request" : {
        "destination" : {
          "name" : "PROXY.REQUEST.QUEUE",
          "type" : "QUEUE"
        },
        "bodyMatcher" : {
          "anything" : "anything"
        }
      },
      "response" : {
        "destination" : {
          "name" : "REAL.REQUEST.QUEUE",
          "type" : "QUEUE"
        },
        "ibmMqResponseTransformerClassName" : "com.trafficparrot.sdk.example.nativeibmmq.TransformAndProxyRequestMessage"
      },
      "receiveThreads" : 1,
      "sendThreads" : 1
    }
  8. Stop Traffic Parrot
  9. Start Traffic Parrot
  10. Start the virtual service in replay mode and send a Native MQ request message to REAL.REQUEST.QUEUE with body <ns:transactions xmlns:ns="http://example.trafficparrot.com"><get><startDate>2020-01-03</startDate></get></ns:transactions>
  11. The response message should be a transformed request message (the body had a date moved in the past) sent to the real request queue.

Runtime properties

Extensions may access a standard set of runtime properties:

  • Properties specific to the virtual service named "properties", with directories relative to scenarios/ServiceName/*
  • Properties shared amongst all virtual services named "sharedProperties", with directories relative to the installation root (as defined in trafficparrot.virtualservice.trafficFilesRootUrl)

To access the properties in response transformers:

  • Properties properties = (Properties) parameters.get("properties");
  • Properties sharedProperties = (Properties) parameters.get("sharedProperties");

To access the properties in handlebars helpers:

  • Properties properties = (Properties) options.context.get("properties");
  • Properties sharedProperties = (Properties) options.context.get("sharedProperties");

Available property names:

Property name Description Example access
dataDirectory The location of the data directory, which can be e.g. used to store CSV and XLS files Path dataDirectory = Paths.get(properties.getProperty("dataDirectory"));
databaseConnectionsFile The location of the database-connections.json file containing database configuration JSON Path databaseConnectionsFile = Paths.get(properties.getProperty("databaseConnectionsFile"));
scenarioDirectory The working directory, which is either the virtual service directory scenarios/ServiceName when using "properties" and the installation root when using "sharedProperties" Path scenarioDirectory = Paths.get(properties.getProperty("scenarioDirectory"));